Monday, December 7, 2009

Top 10 Free LifeSaver Softwares of 2009

Life savers? Yes, when you are addicted to your computer, it ceases to be a mere tool in your life! In fact, it becomes your life and you’d do anything, just anything to keep it alive- from black death or blue death or whatever! The top 10 softwares which were real life savers for me in 2009 are :

1.BartPE
One day, my monitor screen just went black! No life - absolutely nothing, just the curser! A virus attack! Silly me, had not backed up my data , I had been wanting to, but never got down to actually doing it! Whatever! Out comes my lifesaver no.1- BartPE, the data saver. This software is really the core of recovery- great for recovering personal files. BartPE copies the Windows files from your hard drive or Windows Installation CD and creates a bootable CD or DVD that you can then use to boot into Windows .However, you need to build the boot disc before your system fails because the program that builds the bootable CD runs in Windows. I would advise you to run it now ,before your PC fails and store the disc it builds, in a safe place. Fortunately, I had done just that!

2.Mozilla Firefox
I just love this browser and have always been a fan of Firefox. Moreover, Firefox also has the option to add extensions that enhances  new features to the browser and tops your user experience.I found these two following tutorials very enlighteneing. Top 10 features of Firefox  and Top 10 must have Firefox extensions

3.Avast - Antivirus
About 6 months back, I bought a brand new desktop and promptly downloaded AVG, antivirus. You see, I wanted to play real safe and not be trampled by a virus! And oh yes, I was proud of myself! I started browsing and .. it happened! My comp froze and an error dialog message flashed on the screen! Thought it was a random error .Started Firefox again and after 5 mins got the same error. Seemed like Firefox was crashing every 5 minutes! I had to switch over to  IE and everything was fine with no problem nor crash. But then, since I don’t much care for IE ,I reinstalled windows, reinstalled AVG and so on but still got the same error. By now I decided to do some investigation and scanned the message boards for  an answer which I ultimately got from some where- ‘Firefox crashes all the time; possible conflict with AVG?’That’s it!I promptly uninstalled AVG and installed Avast. And Avast it has been till today, with no crashes whatsoever! :

4.Centricle
Do I know HTML? Oh no, I do not !(shamefaced) Then how do I put all those codes in my blog? Really simple, Centricle ,is the answer! It is a simple tool, which easily decodes or encodes html codes and allows Bloggers to easily implant the codes into their blogs! For bloggers writing HTML code on posts, this is a very helpful must-have tool , because all that you need  to do is to paste the code that you want to encode or decode into the box in the centricle site , and  hit the button and you are done! It‘s really a cake walk! Now you can paste the encoded html code wherever you want in the post and publish your post. Example of HTML code on a post:

5.CSS Drive
My blog was so stuffed that it was taking an enormous long time to download and what did I do? I just used a CSS compressor. A CSS compressor is a program that minimizes a CSS style sheet by removing all extra white space and makes the style sheet file smaller so that it downloads more quickly! There are many free css compressors available on the web.
To compress your CSS in Blogger-: Go to Dashboard > Layout. Then click Template>Edit Html . Copy all your CSS between without including them.
Then paste it in box on that CSS tweak page and click Tweak . Then copy and paste the tweaked CSS back into template and save. That’s all, your page will load faster. It’s important that you remember to backup your template first.

6.Foxit PDF Reader
Adobe reader really really slowed down my earlier old computer and I tried Foxit PDF Reader. Did I kick myself for not trying this out earlier? Yes,I did. Foxit is no doubt, the best alternative to Adobe PDF reader and I do find Adobe reader too bloated for my simple needs and liking! Besides, Foxit is much more faster and robust than Adobe’s reader .

7.Picasa
Picasa from Google is definitely one of the best free software tools for photo editing . With Picasa you can import your pictures from your camera and edit them to change contrast, remove red eyes and whatever. It is the best available software for managing your photos!

8.Office 2007
I know, it sounds sort of weird to rave about Office 2007 in 2009 and what's more, Office 2010 is just around the corner!  But then, I upgraded to  Office 2007 only this year and was I struck dumb with all the amazing features? Most certainly yes! I love the new Ribbon feature and now, I even publish my blog directly from Word 2007.

9.Reference Tools 
What will I do without those awesome online reference tools like-Wikipedia,Wikihow and online dictionaries.Off line,I use TheSage's English Dictionary and Thesaurus .

10.Amazon's aStore
For those of you who do not want to invest money, Amazon is the best affiliate program to make some money. Patience and a little effort choosing the right products is about all that you invest! I did make some money from Amazon. Amazon’s astore is very easy to set up and you get a commission from the sales when anyone clicking from your store buys stuff from Amazon.Cool! I would suggest that you just go for it! :)

Finally, though I am not adding this to my list , Spider Solitaire ,which comes along with Windows Games is indeed my  stress buster . It may sound boring to many, but then, Spider Solitaire it is for me! I use Recuva to restore accidentally deleted files and do check out, how to recover deleted bookmarks from Firefox.Although you can buy many high quality DRM-free MP3s of entire musical albums in the Amazon MP3 site, I prefer grabbing only the free MP3s!

Last but not the least ,there are so many amazing softwares that were released in the 2009 like Windows7(Microsoft’s latest OS ),Snowleopard (Apple’s OS)  Spotify (online radio app) Digsby , Office 2010 beta ,Skype 4 and many many more.

But the above 10 softwares  really pulled me up from spots in the year 2009!


BTW, this is my entry to Daniel Scosso’s Group Writing Project. I suggest you participate as well.

Copyright © 2009 Laila Rajaratnam. All Rights Reserved 
Hello there! If you are new here, you might want to subscribe to the free RSS feed for updates.
Enter your email address:

Delivered by FeedBurner

Or,maybe,subscribe for free updates in a reader.

Subscribe in a reader


Read more Entry>>

Friday, December 4, 2009

Win32: Delf-MZG scare

Yester day morning, when I switched on my computer, there was this flash from Avast - 'Trojan Horse- Win32: Delf-MZG detected'. I put it in the chest as recommended by them, and thought I would do a virus scan. To my horror, there were 75 infected files, and even my D&E drives seemed to have these Trojan files. Yes, I deleted some, moved some to the virus chest.Then, I rang up my computer store,to check whether I should clean up and reinstall windows .They suggested that if I had deleted the files, then, it’s ok and that I need not reinstall windows! Anyway,I was terrified to open my mails or even go to any of my secured sites.
Well,this morning, I wanted to gather  more info about ‘Win32: Delf-MZG’ before going to any of my secured sites . I Googled ,and here's  the explanation from Avast -support :

Issue

On Thursday 3.12. 2009 avast! had a bad false positive issue. At around 00:15 AM GMT we released VPS update 091203-0 which started flagging hundreds of innocent files as a 'Win32:Delf-MZG' Trojan (or, in less common cases, as 'Win32:Zbot-MKK'). Among the files affected were high-profile programs produced by Adobe, Realtek, sound card drivers, various media players etc.

Solution

On Thursday 3.12. 2009 at 5:50 AM GMT, another VPS update 091203-1 was released, fixing the issue (for both 'Win32:Delf-MZG' and 'Win32:Zbot-MKK'). If you're still using the bad VPS 091203-0 we recommend to invoke a VPS update immediately. To restore false positive files from avast! Virus Chest please follow the instruction in the following article:

Restoring false positive file from Virus Chest

Those who have not used their computers between 12:15 AM GMT and 5:50 AM GMT will most likely not be affected.
We deeply apologize for any inconvenience this has caused.”
BTW,Google Answers was also bursting with questions by perplexed users about this Trojan horse-Win32: Delf-MZG !

 Whew! Now I can go about my normal work! But I was really, really freaked out yesterday seeing a string of Trojan Horse warnings!Surely,you are regularly backing up data on your desktop/laptop, aren’t you? :)

Hello there! If you are new here, you might want to subscribe to the free RSS feed for updates.
Enter your email address:

Delivered by FeedBurner

Or,maybe,subscribe for free updates in a reader.

Subscribe in a reader


Read more Entry>>

Tuesday, December 1, 2009

Top 3 iTunes Lyrics plug-ins

Searching for lyrics? Just stop! Don’t waste time hunting for lyrics to the songs you are listening! Listed here is the 3 top iTunes lyrics plug-ins which will search your iTunes library and automatically display the lyrics of the song you are playing! Oh, and if the lyrics are not found, you can add it yourself! You can edit the way you see the text, color, size and background.  
1. LyricsSeeker Plugin for iTunes, WinAmp and Windows Media Player.
The  LyricsSeeker Plugin  allows you to find  lyrics to the songs in your music library of  iTunes, WinAmp or Windows Media Player .
How it works-
If matching lyrics are found, a notification balloon will appear. Simply click on the notification balloon and the Lyrics will be shown in your Internet browser. Ofcourse, you must have an active Internet connection to access the lyrics.
The instruction for installation is found here.

 2  iLyrics 2.4.1
iLyrics is a free and lightweight Dashboard widget that will fetch lyrics for your iTunes. The new release supports snow leopard and it stops looking for lyrics on internet if current track is Podcast or Video
Some of the key features of iLyrics are:
• Search artwork and lyrics form 4+ source at the same time
• Double click iLyrics widget to copy the lyrics and song info
• Double click the artwork, it would open the url from browser if the artwork was found from internet
• Support reading/saving lyrics from song itself
• Support reading artwork from song itself

3. Lyricsnapper
Lyricsnapper searches the web for lyrics, to the currently playing songs in iTunes. You can save those lyrics to your song info, and the next time that song is played, those lyrics are displayed.
Features-
• Retrieves lyrics of your favorites songs from the internet
• Option to auto-update the lyrics in your iTunes library
• Integrates with iTunes
• Updates the lyrics in your iTunes library
• Easy to use
Well...take your pick!
Hello there! If you are new here, you might want to subscribe to the free RSS feed for updates.
Enter your email address:

Delivered by FeedBurner

Or,maybe,subscribe for free updates in a reader.

Subscribe in a reader
Read more Entry>>

Thursday, November 26, 2009

iTunes U - Free Educational Tool

Are you on the lookout for free educational downloads? Well then, there is this free service iTunes U,  that offer you over 200, 000 free audio and video lessons on a wide range of subjects.. What is  iTunes U? It is a free educational tool that is part of iTunes Store and provides audio books and video lectures on whatever category of subject you want, whether it is mathematics, language, science or fine arts! You can enjoy these educational downloads either on your Mac, PC or transfer them to an iPod or iPhone for learning on the go!

The materials that iTunes U hosts are created mostly by top universities like Stanford, Cambridge and Carnegie Mellon, and top colleges, museums, public media organizations and other educational organizations and hence, it is of high quality. iTunes U is a great place for those who love to learn. With the release of iTunes 9, Apple has featured this great amazing content prominently inside the application. There's a 'Top Downloads' section too which displays the most popular downloads and you can get  an inspiration on what you'd like to study next! Some of this educational content is implemented as podcasts as well.


With this free educational tool - iTunes U, there's no end to what or where you can learn! :)

Hello there! If you are new here, you might want to subscribe to the free RSS feed for updates.

Enter your email address:


Delivered by FeedBurner
Or,maybe,subscribe for free updates in a reader.

Subscribe in a reader


Copyright © 2009 Laila Rajaratnam. All Rights Reserved Read more Entry>>

Wednesday, November 25, 2009

Top 3 Free DJ Software

Would you like to create your own remixes? Well, you can have loads of  fun by using free DJ software program to remix your MP3 music library! You can use your existing digital music files to produce unique remixes. Some DJ software even allows you to record your musical mixes to a separate digital audio file such as an MP3
Check out these 3 following free amazing DJ software programs which are easy to use even if you are a beginner and they do have a good basic functionality as well as some professional features too. Amuse yourself with these free DJ programs and mix like a pro!

Kramixer ( http://www.kramware.com/index.html )

Kramixer is a free DJ software program that runs on most versions of Windows. This free DJ software program has a good selection of real-time effects such as echo, reverb, low pass, and even a robotic effect that’s great for vocals.You can record your mix to an mp3 file for excellent quality sound,  ample storage and easy distribution. Looping is also available with the ability to set 2 loop points per channel. This is a great program loaded with features.

Mixxx   (http://www.mixxx.org/)

Mixxx is an open source DJ software for Windows, Mac OS X, and Linux- Superior mixing engine with recording, vinyl control, and more. Mixxx also supports Midi control if you have any external hardware and has a range of real-time effects and you can also record your mixes in WAV format.

Ultramixer   (http://www.ultramixer.com/)

This free edition of Ultramixer 2 for Windows, Mac OS X, and Linux operating systems has the basic elements you need to create live mixes. To unlock the program, first, you need to register s and a free key is sent to you along with a unique code. Although the free edition of Ultramixer 2 isn’t as full-featured as Mixxx for example, it allows you  to import your iTunes playlists and start creating live mixes straight away. The program is very easy to use and all the controls are well laid out.

So here’s to the new DJ! Cheers!  :)

Hello there! If you are new here, you might want to subscribe to the free RSS feed for updates.

Enter your email address:


Delivered by FeedBurner
Read more Entry>>

Tuesday, November 17, 2009

Publish Blog from Word 2007

Did you know that you can publish directly to your blog from Word 2007? Well, that’s one of the new features of Word 2007! You can publish to popular services such as Blogger, Typepad, Wordpress, Windows Live Spaces and others. All that you need, is  internet connection to publish the posts which you have prepared, directly from Word! To start with, you have to create and configure an account in Word and start blogging. You will be able to insert pictures, links, and formatted text as well!

To create and configure an account in Word 2007:
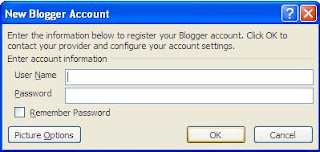
•    Click the Office button > Publish > Blog .


•  As this is the first time the Blog account is set up, click the Register Now button in the Register a Blog Account dialog.


•  In the New Blog Account dialog, select your blog provider- Blogger or WordPress or whatever, from the drop down menu.


  • Provide the login details.

  • If you would like Word to upload pictures for you, click  the Picture Options button.


  • You can choose to have Word publish images directly to your blog provider or to your server, if you or a host is serving your site.

Now, you will notice that the Ribbon has changed to blogging mode! You can Publish, Publish as draft, Insert your categories , Open existing posts, set up new blogs and even insert HTML objects like pictures, links and much more! You can even create image effects and drop shadows! Cool!
Now create your blog post and when done, click the Publish button. Your post has been published and live!
That's great! Done! :)


Hello there! If you are new here, you might want to subscribe to the free RSS feed for updates.
Enter your email address:


Delivered by FeedBurner

Copyright © 2009 Laila Rajaratnam. All Rights Reserved Read more Entry>>

Link from one post to another post in the same blog

Would you want to link a certain post to another post in the same blog? Actually it’s really simple as a pie! The first thing you need to do is to enable individual post page (permalink).

To do enable post page :
Go to Dashboard
Click SETTING > ARCHIVING
In the drop down menu for Enable post pages? - set to Yes
Click Save setting.


Now each  your blog post will have an individual post and a unique URL. Good!

Now, to link the post you want , you need to get the URL of that individual post page.
To get the URL of the individual post :
Go to Dashbord> Edit Post .
Click Edit Post and a list of all your posts will be displayed.
Right-click on VIEW on the particular post you want to link to.
Select Copy link location (this is for FireFox. Wording may be different for other browsers)


Open Notepad and paste the URL  there.
Next,highlight the text in your post in the post editor, that  you want to be displayed as the link and click on the Link icon.
An Edit Link  dialog box will pop up.


Type in the url of your post saved in the notepad.
Click OK. Your post has been linked to another post in the same blog! :)
That’s it!

Like this post? Why don't you subscribe to the free RSS feed?
Enter your email address:

Delivered by FeedBurner
Read more Entry>>

Friday, November 13, 2009

Customize Word 2007 Ribbon

Do you feel that Word 2007 Ribbon is taking up too much space on your desktop ? Would you rather have one toolbar displaying only the most frequently used commands? Well, you can set up Word 2007 to do just that!
The Ribbon 


First, to hide the Ribbon, open Word, press Ctrl and F1 or double-click the Home tab. The Ribbon will disappear from view, leaving only the Ribbon tabs and the Quick Access toolbar visible on the screen.
When you want to use a certain command on the Ribbon, click on the appropriate tab and it will display its Ribbon group. When you are done with the command, click on the tab to hide the Ribbon again.
You can customize Word 2007 Ribbon by adding certain commands that you frequently use, to the Quick Access toolbar.
Just follow these simple steps to customize the Word 2007 Ribbon.
1. Click the Customize Quick Access Toolbar button found to the right of the Office button.


2. Click More Commands.


3. In the Choose commands from box, click the drop-down arrow and then click All Commands.
4. Click the feature you want.
5. Click the Add button and click OK.
Yes, you're done! You have customized the word ribbon to your needs!


Do you want to format without the Ribbon? Well, by right-clicking any part of your document will bring up a shortcut menu of formatting commands that relate to the part of the document you clicked.


Also, for instance, right-clicking the footer will display the Edit Footers shortcut menu.


The Mini Tool Bar
The Mini tool bar, offering a group of the more commonly used commands displays automatically when you point the cursor to a selected highlighted text. The mini tool bar will appear faded and if you point the cursor at the mini tool bar, it becomes solid and you can select a command to use.


This option is a real time saver! You don't have to switch to the Home tab each time you have to perform related tasks. The mini toolbar sometimes disappears and to get it back, reselect the text or right click the selection.

If don't want the mini tool bar,you can disable it:
Click the Office Button > Word Options > Popular, and uncheck Show Mini Toolbar on Selection.


That's it! 

Note:   You cannot customize the Mini Tool bar.

Like this post? Why don't you subscribe to the free RSS feed?  
Enter your email address:

Delivered by FeedBurner


Read more Entry>>

Thursday, November 12, 2009

MS Word 2007

I know that it is a little late in the day to be raving about Word 2007! But then, I was so very into Office 2003 and contented that I was just cruising along with that antique version. Fortunately my computer was struck by a virus about 2 weeks ago and I had to reinstall windows and reluctantly upgraded to Office 2007.WOW! What an upgrade! It’s too good! Amazing! Now I am kicking myself for not upgrading earlier. And of course, Office 2010 is already around the corner!

What can one say about Word 2007? It’s awesome!

The old Menu and Toolbars have been replaced with the new Ribbon. The Ribbon makes accessing your fav tools so very easy! Once you are familiar with using the ribbon in Word 2007, you will find the switch to all the other products in Office 2007 a snap , as  the Ribbon is common to Excel, Powerpoint, Outlook, Access etc.
 The Ribbon


The other new concepts in Word 2007 are the :

    *  Mini Toolbars

    * Quick Access Toolbar

    * Key Tips

    * Office Button

    * Styles

    * Themes

    * Building Blocks

    * Publish

    * Content Controls

    * SmartArt

And many more...

Themes allow you to change the entire look of a document with just a few mouse clicks whereas Building blocks let you to create reusable content and Quick Styles helps you to enhance the pictures you Inserted with effects like drop shadow ,borders and more.

However, the icing on the cake is the Live Preview function, which lets you to see how the document looks, when you hover the cursor over any of the ribbon's design elements, such as fonts in Word or charts in Excel.

The relocation of your favorite features in Word 2007, can easily be mastered and you can enjoy all the new features Word 2007 offers! Read more Entry>>

Wednesday, November 11, 2009

Publish Blog Post via Email or Mobile

Publish blog post via email or mobile ? Well yes, you can publish your blog post by email or mobile! The Mail-to-Blogger feature in blogger enables you to publish your blog  post via email. But then, first you need to make a tiny change in your blog setting.

Just follow these simple easy  steps.

1. Go to Settings >E-mail & Mobile >Posting Options.


2. Fill in the Mail-to-Blogger email address. It should read like this :- username.secretword@blogger.com. Note that this email address should  be kept as a secret or anyone who has this mail id, would be able to post to your blog.
3.Finally, choose one of the 3 options:
 •Publish emails immediately
 •Save emails as draft posts
 •Disabled
Be sure to choose - Publish Emails Immediately. If this option is not checked, then your posts will be saved as drafts and will not appear on your blog till you log on to Blogger.com and publish them yourself.
4.For Mobile devices: Click Add Mobile devices.
The following dialog box will open.Send the verification code from your mobile device.Yes,Done!


 5. Click Save Settings.

That's it! Now you are  ready to send blog posts by email or your device. The subjects of your email letters will be the titles of your posts, and the body of the emails will be the posts . To include an image in your post, you can attach an image to your email.
Note:
 Sometimes email programs append text to the bottom of each sent message. Hence, fix # at the end of your post! Done!  :) Read more Entry>>

Saturday, November 7, 2009

iConcertCal - An iTunes Plug-In for iPhone

iConcertCal is a free iTunes plug-in that scans your music library and if any of the artists in your music library are playing concerts  in your area, they will automatically show up in a "My Shows" list. It supports searches in the US, Canada, and the UK and is available for both Windows and Mac OS X.

iConcertCal (http://www.iconcertcal.com/iphone.php) or 
is now available for the iPhone! Using the new features in the APIs of iPhone OS 3.0, it checks all the artists in the iTunes library of your iPhone, uses the built in GPS to find your location and then displays results. You can update your preferences and edit your location and the radius in which you’re willing to travel to see concerts. iConcertCal will show you all concerts playing in those locations and radius! Cool!
Each concert listing has:
  • links to purchase tickets
  • an email option to send a reminder to yourself or to alert your friends about a concert
  • a built in map to the venue with directions
  • a preview button that will allow you to listen to what each of the bands sound like to help you decide if you want to go
So,what happens if your largest iTunes library lives on another computer? Well, then,you should go to their website ,on the computer containing your largest library, and set up an account. All the artists on that computer will be indexed. Next go to the app and use the same settings. Automatically all the artists on the computer will be transferred to the iPhone app whether or not the artists are on the iPhone, and that information will be used by the iConcertCal app.


Enjoy this cool plugin! :)

Like this post? Why don't you subscribe to the free RSS feed?
Enter your email address:


Delivered by FeedBurner
Or,maybe,subscribe for free updates in a reader.

Subscribe in a reader

Read more Entry>>

Monday, October 26, 2009

Grab Music from MP3 blogs using Peel

The MP3 blogs are a great boon for music lovers! These blogs are a great way to download songs ,discover new music and encourages struggling and new artists to make a name for themselves.
Well,you love the MP3 blogs,but then,you do not want to go to those blogs everyday to download the music .So what do you do? Download a program called Peel .

What is Peel? Peel is a cool Mac-only program that allows  you to grab the MP3s from MP3 blogs, lets you preview and download the files as well. You can also add them to iTunes and subscribe to blogs for songs. It’s like an RSS reader just for MP3s.

First,you have to  subscribe to MP3 blogs and Peel will check out the songs in the blog for you! You can listen to them by using the play/pause button at the top of the window just like in iTunes or by double clicking the file . If you want the file, you can download the song by clicking the download  arrow icon. You can even visit the website of the blog by launching your browser from within Peel.

Adding Files to iTunes

The songs can be automatically added to iTunes when you download them or you can download the songs  to your desktop or documents folder  and then add them maually to
iTunes.
It’s simple to use and costs $14.95.There is a trial period of 25 days.
You can download Peel from here.( http://www.getpeel.com/ )


Note: Sorry PC users, Peel is a Mac-only program.

Like this post? Why don't you subscribe to the free RSS feed? 

Enter your email address:

Delivered by FeedBurner
Read more Entry>>

Sunday, October 18, 2009

Create Three Columns to Blogger Footer Section

Yes, the default Blogger template has only one column footer, but then, you would have noticed that many blogs and websites have  three columns footer. The advantages are that :

    * You will have more space for additional widgets and gadgets.
    * If you position all the bigger gadgets at the footer section, the main content will load faster.

It's a breeze to apply  three columns footer to your Blogger template!

Just follow these 5 simple steps:

Step1.
Go to Layout > Edit HTML . Back-up your existing blog. Check out these tutorials if you are unsure of the procedure.

Step2.
Remove all widgets and gadgets from the footer section. You can even drag and drop those widgets from the footer section to the sidebars. You can put it back at the footer after you are done.

Step 3:
First, locate <b:section class='footer' id='footer'/>
Replace the entire line with the following code-

<div id='footer-column-container'>

        <div id='footer2' style='width: 30%; float: left; margin:0; text-align: left;'>

            <b:section class='footer-column' id='col1' preferred='yes' style='float:left;'/>
        </div>

        <div id='footer3' style='width: 40%; float: left; margin:0; text-align: left;'>
            <b:section class='footer-column' id='col2' preferred='yes' style='float:left;'/>
        </div>

        <div id='footer4' style='width: 30%; float: right; margin:0; text-align: left;'>

            <b:section class='footer-column' id='col3' preferred='yes' style='float:right;'/>
        </div>

<div style='clear:both;'/>
<p>
<hr align='center' color='#5d5d54' width='90%'/></p>
<div id='footer-bottom' style='text-align: center; padding: 10px; text-transform: lowercase;'>

<b:section class='footer' id='col-bottom' preferred='yes'>
<b:widget id='Text2' locked='false' title='' type='Text'/>
</b:section>

</div>
<div style='clear:both;'/>

</div>


Preview and Save the template.

Step 4.
Next,you have to add a small code again to hold all the footer columns, so that the widgets don't get pushed beneath each other when you add them later. Go to Edit HTML again and search for </b:skin> tag.
Immediately before </b:skin> tag add the following lines of code:

#footer-column-container {
clear:both;
}

.footer-column {
padding: 10px;
}

 
Step 5:
Finally, click the  Save Template button to save the whole modified code. 


That’s it! Done! Now, your blog has three columns in the footer section! Have fun adding more widgets to your blog! :)


Like this post? Why don't you subscribe to the free RSS feed?  


Enter your email address:

Delivered by FeedBurner

Read more Entry>>

Saturday, October 17, 2009

Top 4 Music Download Services

There are many MP3 music download sites available on the net where you can download MP3 music for your iPod and MP3 players. But then, the following are the top 4 music download service sites for your ipod/iphone.


 1.     iTunes Store

Itunes store is still the best. The iTunes Store has the largest collection of music, TV shows, movies, or podcasts and continues to add cool new features like iTunes Movie Rentals  and the integration of the store with the iPod / iPhone

2. AmazonMP3

A new entry to this category, AmazonMP3 gives iTunes a real challenge. It has music downloads for any device and the music downloads instantly and automatically to iTunes and Windows Media player. You have to install their Amazon MP3 Downloader before your first purchase and makes downloading songs fast and easy. Above all they have a free song a day offer which you can download for free!

3. eMusic 

EMusic has been in this space for a long time and offers DRM-free music at good prices. They are the  first service to sell audiobooks in MP3 in 2007. You can listen and download a free track every day. Their music is  guaranteed to work on any MP3 Player including the iPod and Zune. Their eMusic discovery toolbar makes it easy for you to go to any category on their site- free music, streaming radio, browse music etc.


4. Napster  

Napster was once the rage of the digital, free-music revolution. This subscription-based legal file-sharing service, also offers an MP3 store a la iTunes and AmazonMP3.They offer a Napster To Go subscription which allows you to transfer unlimited music to music-enabled cell phones as well.Unfortunately, iPod and Zune players are not compatible with Napster To Go. But then,Napster To Go tracks can be downloaded on up to 3 PCs and transferred to 3 portable music players or phones.And while Napster offers a similar catalog to those other popular sites, its user interface is difficult and it has no features to tempt users away from the market leaders.

For more details check out their websites! Have fun downloading mp3 and adding up your music collection!
Read more Entry>>

Tuesday, October 13, 2009

iTunes 9’s Home Sharing Feature

ITunes 9 offers a new feature called Home Sharing. Home Sharing allows you to share the songs and movies that you buy, with up to five authorized computers in your house. But then, all the five machines must be on the same home network and tied to the same iTunes account. This keeps you and your family from sharing music but it doesn't support sharing between home and office computers. Still, this is way better than what we had!


You can drag songs from one library to another and new purchases can also be automatically copied across multiple machines. This solves the problem of needing to make all your iTunes buys on a single piece of hardware. Now you will also be able to store your collections on the larger hard drive and copy, to and from your laptop or wherever, as you wish!


 Moreover, itunes9 also makes it possible for you to arrange your iPhone's home application menu screens with applications you use most often.

Thus, in terms of convenience, Home Sharing is a great boon for current iTunes users! Enjoy iTunes9! Read more Entry>>

Monday, October 5, 2009

Create iTunes Account Without a Credit Card

ITunes  is the program that Apple offers, for you to buy and store your songs, podcasts, movies and audio books. It allows you to synch with your iPod and iPhone as well. Thus,it is a good idea to have an account with the itunes store.

If you do not want to use your credit card to create an account in iTunes store, fine..don’t! But then, Apple requires you to have some form of payment on hand while creating an iTunes account because Apple would want to bill you for any commercial content you may buy. Even though you can download loads of free content at the iTunes Store, you can buy content as well! Thus you do need an account.

If you don’t have a credit card or do not want to use your credit card , you can use a PayPal account. You can choose to have your purchases billed to that account instead .You can register for free here and create an account with just your email id.You will be able to do all your transactions through PayPal.

Can you create an iTunes account with an iTunes Gift Card? Well, no. That’s because, iTunes Store doesn’t prevent you from buying content worth more than the value of your gift card and it would want to bill you for the extra amount. However, you can add a gift card to your iTunes account.

So, create a PayPal account and go about purchasing stuff from iTunes without using your credit card!
Read more Entry>>

Sunday, October 4, 2009

Apple debuts iTunes 9

Apple has release of the latest version of its media management and sales program, iTunes Version 9. ITunes 9 has added support for iTunes LP, a redesigned iTunes Store, new iPods, integration with social networking systems like Facebook and Twitter, and more.

Itunes 9’s new features include:
  • A redesigned iTunes Store
  • Allows Facebook and Twitter integration so that users can post media links to those social media services
  • Syncing options for iPod and iPhone have been improved.
  • Upgraded management of movies and App Store programs on the desktop as well and not just on the iPhone or iPod
  • You can re-arrange the iPhone or iPod touch homescreen from the desktop and on the device too.
  • An add on to the iTunes Genius feature  called Genius Mixes  to create great playlists
  • Simple and easy method of sharing media between computers in the same house.
  • Extras content for movies from the iTunes Store
You can download iTunes 9 for free through Apple's standard Software Update tool. Read more Entry>>

Thursday, September 17, 2009

ITunes WiFi Music Store

The iTunes WiFi Music Store allows iPod touch and iPhone users to browse, preview and then purchase music, movies and TV shows from the iTunes Store .The purchased items will be downloaded directly to the wireless device- iPod touch or iPhone . Previously, iTunes Store purchases had to be made using the iTunes software on computers, but now, the downloaded item is available to be played instantaneously on the device. And, the next time the device is connected to the computer, the songs purchased wirelessly will get synced to the computer's iTunes library. Awesome!


Furthermore, the iTunes' ringtone feature, allows users to buy songs and convert them into ringtones immediately, on the go, without the computer. Cool!

What are the requirements for the iTunes WiFi Music Store?
All you need is:
  • An iPhone or iPod touch running firmware 1.1.1
  • A WiFi connection
  • An iTunes Store account
And of course, some money! :)
 To buy music from the iTunes WiFi Music Store all you have to do is to follow these simple steps:  
  1. Connect to a WiFi Network - You will be able to access the WiFi Music Store only when connected to a WiFi network.
  2. Access the Store and Browse for Content - Just tap the purple arrow icon in the bottom right corner of the iPhone or iPod touch’s home screen to access the store. At the store, you will be able to browse for certain featured music ,view the various Top Ten lists or search the store by tapping the icons at the bottom of the screen.
  3.    Preview the Music -. Tap the name of a song to hear a preview. Tap it again to stop the preview.
  4. Buy the Music - To buy a song or album, tap the price next to it. A button that reads “Buy Now” will appear. To dismiss the button, tap anywhere on the screen other than on the button. To make the purchase, tap that button. 
  5. Download the Music - Most songs download in about 10 seconds. You can watch the progress of your download in the Downloads section, accessed through the button on the bottom right of the screen.
  6. Listen to Your Music - Once the download is complete, a “Purchased” button will show at the top-right corner of the Downloads screen. Tap that button to go to your list of music purchased from the iTunes WiFi Music Store and happily listen away to your music.
 How to add music bought from the iTunes WiFi Music Store to iTunes?
Easy – just connect your iPhone or iPod touch to the computer and any purchases from the WiFi Music Store will be automatically added to your iTunes library, along with a new playlist called ‘Purchased’ .Now wasn’t that easy and cool? Enjoy!


Copyright © 2009 Laila Rajaratnam. All Rights Reserved Read more Entry>>

Sunday, September 13, 2009

14 Hot Upcoming Gadgets for Holidays 2009

 With the holidays around the corner, surely you would be curious to check out the cool, awesome upcoming gadgets. Well, I have bunched together a few upcoming gadgets for you to feast your eyes on!You do have ample time to munch on these suggestions and then, take your pick when they hit the market! :)

You will find the  listing here:

14 Hot Upcoming Gadgets for Holidays 2009

Hope you enjoy reading about these upcoming gadgets and please do drop in a comment if you found the article  useful! :) Read more Entry>>

Tuesday, September 8, 2009

New Blogger Post Editor

Blogger has launched a new rich Post Editor, which is quite cool!  :)
To switch over to the new post editor:
Go to Dashboard>Settings>Basic
Scroll down and you will see the Select Post Editor!

Check Update editor and Save settings.
 Next,when you click on the New Post you will see the new rich post editor ! It has a bunch of editing goodies for us! Let's take a peek at some of the obvious notable features.
   1. It has Undo/Redo button.
   2. It has Strike Through button – so, no more messing around with the blogger template and changing the codes.
   3. New Color Pickers: You will now be able to highlight the text with color and you have more options  to use them .
   4. Add a Link : A brand new way to add a link on Blogger. Now you don't have to select the text to add a link. Just click on Link Button and enter the text and link. Done! Moreover you can also link to an email address.Awesome!


5 Add a Picture : This is also a great improvement on the old post editor. You can add an  image in the same post editor – no pop-up box. All the uploaded images will all be displayed in the same box and you can insert these images wherever your cursor is placed in the post editor.
And after you upload your photo you can easily adjust the size of the image along with placement. You can also remove an image with a click of the Remove button. Like this:

6. The preview of the post also opens in a new pop-up window .


This post editor feature is optional and you have the choice to revert back to the original editor if you are not too keen on this new one.Whatever...take your pick! :)

Read more Entry>>

Saturday, September 5, 2009

Free Social Networking Icons

Icons! Who does not love fancy icons for their blogs and websites? Here are some amazing and awesome free collection of icons for Social Networking sites like, Facebook,Twitter, Reddit, Stumbleupon and so on and so forth.Take your pick and use them for your blogs or websites. They are all free. Enjoy!

Hope you loved it just as much as I did! They are all free just for you! :) Read more Entry>>

Wednesday, September 2, 2009

Back-up Blogger Blog Completely with Posts + Comments + Gadgets

It is always wise to save and back up your blog. We hear of instances where a blog just vanishes! You would not want to be left in the lurch wondering how you can ever replace all the posts and your comments. Or maybe, you would like to transfer your blog to another domain or whatever! I will show you a simple and a very easy method where you can back up your blog, along with your posts, comments and gadgets!
  • Log in to your blogger account and go to Dashboard.
  • Choose the blog you want to back up and go to Settings.
  • From the Settings page, select Basic.
  • Under Basic, you will see Blog Tools and click on the Export blog option.


  • An Export your blog box will open up and click on DOWNLOAD BLOG button .
  • You will be prompted to choose the location on your hard drive where you can save your blog.

That’s it! Your blog will be downloaded to that location!Your done! Good! :)
An important note:

The blog which you have Exported will be in an .xml document. It's size will be small but then, it does contain all your posts, comments and gadgets If you open the file, you will not be able to read the file but when you upload it to a blog , you will be able to view your blog along with all the posts, comments and gadgets .Thus you can save your blog completely into your hard drive and use it when required!
To save only your Template and Post check out here.
To save just your Widgets or Page elements check out here.
Hope this was useful to you. Please do give me your feed back, so that I can improve the way I explain! :)
Hello there! If you are new here, you might want to subscribe to the free RSS feed for updates.
Enter your email address:

Delivered by FeedBurner

Or,maybe,subscribe for free updates in a reader.

Subscribe in a reader
Read more Entry>>

Back up or Save your Blogger Template

Would you like to back up your blogger template along with your posts? Well, it is a good idea to back up your template especially when you need to customize your template, so that, even when something does go wrong, you will have a - back up!Backing up your template with your posts is really a cake walk!

All that you do, is to:

Go to Dashboard > Layout > Edit HTML .

Click on the Download Full Template under Backup/Restore section.

You will prompted to choose a location in your hard drive for the download .

Your blogger template will be downloaded in that location in your hard drive.

Done! Wasn’t this so very simple?

Read more Entry>>

Monday, August 31, 2009

How to Save or Back up Widgets in Blogger

There are many methods to back up blogger widgets, but I am going to show you just the easiest one, which does not require you to play around with css codes and edit html templates.
Before you start, I would suggest that you take a screenshot of your blog with the widgets or maybe even the Page Elements page, so that you know exactly where the widgets or page elements are placed in your old template.

Now, to back-up all the widgets, do as follows:

  • Log into your blogger account.
  • Go to Dashboard .
  • Click on Layout. The Add and Arrange Page Element window will open up.

  • You will see an Edit option on each of the widget's right-bottom corner.
  • Click Edit.

A pop-up window will open and you will find some codes there. Copy the code and save them to a notepad file. Name each block of codes with the title of that particular widget. This is because, when you reinstall the widgets, it will be easier for you to realize which code belongs to a particular widget.


Back-up all the gadgets, in this similar manner and save them all in a notepad file.

You do not need to back-up the following widget codes as they are the default gadgets to your blog and will be automatically uploaded to your new template.

  • About Me gadget
  • Followers gadget
  • Archives gadget
  • Label gadget

Yes, thats it! Done! Your widgets have been saved.

To install the widgets, go to the Add a Page Element page, click on Add a gadget and copy the codes. Done!Your widgets are back in the new template! Cool! :) Hope this was useful to you! Read more Entry>>

How to Install Blogger XML Template

Are you sick and tired of the usual templates supplied by blogger? Well, you can always go in for those wonderful, amazing customized XML templates available on the internet! Switching over to those xml templates from your current template is really a breeze! You can have it, all up and running in a matter of minutes!

Choose and download the template of you choice to your computer. If the template is in a zip file, then, unzip it and extract it. Next, if you have loads of widgets in your present template you can Save the Widgets before installing the Xml template or if you not care about losing those widgets, just move on to the following steps.

  • Log in to your Blogger dashboard and go to Template> Edit Html.
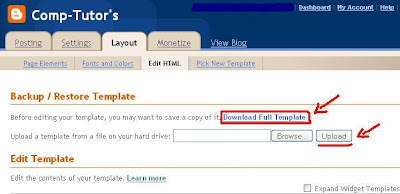
  • Back up your template by clicking on the "Download Full Template" and save it in your hard drive.(In case something goes wrong ,you will always be able to upload your original template.)
  • To “Upload a template from a file on your hard drive" :Click the Browse button and enter the location of your xml template file.
  • Click Upload .The Html of your new template will now appear in the box below.


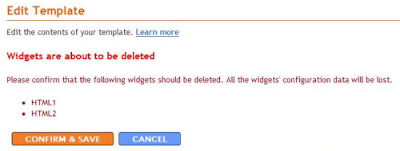
If you are using the new template for the first time ,you can click on the Save Template button. But then, if you have some widgets in the old template you will get a message like this:

Let's say that you do not want the existing widgets, then go ahead and click on the “Confirm and Save” button . But, on the other hand, if you want all those widgets or Page Elements then follow this tutorial.

That’s it! Your new template has been uploaded successfully! Have fun changing your templates!:) Read more Entry>>

Tuesday, August 25, 2009

Nokia Booklet 3G -mini laptop

There’s good news for Nokia fans! Nokia has finally announced a very real 10-inch mini-laptop or netbook called Booklet 3G.
Running an Atom Z530 processor instead of the more common N270, it also has:
• An HDMI port
• Wi-Fi
• 3G (obviously)
• A Webcam
• An SD card reader
• A-GPS and maps integration
• Bluetooth
• A12-hour battery life
• A 2cm (.78 inch), 2.7lb aluminum body that's sleek and sophisticated.
The Booklet 3G also runs Windows -as to whether it's Windows 7, Nokia isn't announcing it as yet.


The other unique feature of Nokia 3G Booklet, is its integration with Nokia's Ovi tools, maps, music store, and cloud-based Ovi Suite. Nokia has yet to make public how much software it will be adding to Windows , but then it would be a cool idea to add a great deal of their mobility-assisting software as possible.
The price or launch date has not been announced yet and Nokia plans to disclose a lot more on September 2.
More more info ..check out Nokia's Press release.


Read more Entry>>