Thursday, November 26, 2009

iTunes U - Free Educational Tool

Are you on the lookout for free educational downloads? Well then, there is this free service iTunes U,  that offer you over 200, 000 free audio and video lessons on a wide range of subjects.. What is  iTunes U? It is a free educational tool that is part of iTunes Store and provides audio books and video lectures on whatever category of subject you want, whether it is mathematics, language, science or fine arts! You can enjoy these educational downloads either on your Mac, PC or transfer them to an iPod or iPhone for learning on the go!

The materials that iTunes U hosts are created mostly by top universities like Stanford, Cambridge and Carnegie Mellon, and top colleges, museums, public media organizations and other educational organizations and hence, it is of high quality. iTunes U is a great place for those who love to learn. With the release of iTunes 9, Apple has featured this great amazing content prominently inside the application. There's a 'Top Downloads' section too which displays the most popular downloads and you can get  an inspiration on what you'd like to study next! Some of this educational content is implemented as podcasts as well.


With this free educational tool - iTunes U, there's no end to what or where you can learn! :)

Hello there! If you are new here, you might want to subscribe to the free RSS feed for updates.

Enter your email address:


Delivered by FeedBurner
Or,maybe,subscribe for free updates in a reader.

Subscribe in a reader


Copyright © 2009 Laila Rajaratnam. All Rights Reserved Read more Entry>>

Wednesday, November 25, 2009

Top 3 Free DJ Software

Would you like to create your own remixes? Well, you can have loads of  fun by using free DJ software program to remix your MP3 music library! You can use your existing digital music files to produce unique remixes. Some DJ software even allows you to record your musical mixes to a separate digital audio file such as an MP3
Check out these 3 following free amazing DJ software programs which are easy to use even if you are a beginner and they do have a good basic functionality as well as some professional features too. Amuse yourself with these free DJ programs and mix like a pro!

Kramixer ( http://www.kramware.com/index.html )

Kramixer is a free DJ software program that runs on most versions of Windows. This free DJ software program has a good selection of real-time effects such as echo, reverb, low pass, and even a robotic effect that’s great for vocals.You can record your mix to an mp3 file for excellent quality sound,  ample storage and easy distribution. Looping is also available with the ability to set 2 loop points per channel. This is a great program loaded with features.

Mixxx   (http://www.mixxx.org/)

Mixxx is an open source DJ software for Windows, Mac OS X, and Linux- Superior mixing engine with recording, vinyl control, and more. Mixxx also supports Midi control if you have any external hardware and has a range of real-time effects and you can also record your mixes in WAV format.

Ultramixer   (http://www.ultramixer.com/)

This free edition of Ultramixer 2 for Windows, Mac OS X, and Linux operating systems has the basic elements you need to create live mixes. To unlock the program, first, you need to register s and a free key is sent to you along with a unique code. Although the free edition of Ultramixer 2 isn’t as full-featured as Mixxx for example, it allows you  to import your iTunes playlists and start creating live mixes straight away. The program is very easy to use and all the controls are well laid out.

So here’s to the new DJ! Cheers!  :)

Hello there! If you are new here, you might want to subscribe to the free RSS feed for updates.

Enter your email address:


Delivered by FeedBurner
Read more Entry>>

Tuesday, November 17, 2009

Publish Blog from Word 2007

Did you know that you can publish directly to your blog from Word 2007? Well, that’s one of the new features of Word 2007! You can publish to popular services such as Blogger, Typepad, Wordpress, Windows Live Spaces and others. All that you need, is  internet connection to publish the posts which you have prepared, directly from Word! To start with, you have to create and configure an account in Word and start blogging. You will be able to insert pictures, links, and formatted text as well!

To create and configure an account in Word 2007:
•    Click the Office button > Publish > Blog .


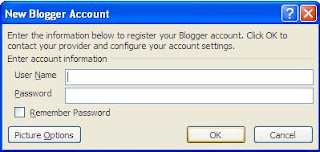
•  As this is the first time the Blog account is set up, click the Register Now button in the Register a Blog Account dialog.


•  In the New Blog Account dialog, select your blog provider- Blogger or WordPress or whatever, from the drop down menu.


  • Provide the login details.

  • If you would like Word to upload pictures for you, click  the Picture Options button.


  • You can choose to have Word publish images directly to your blog provider or to your server, if you or a host is serving your site.

Now, you will notice that the Ribbon has changed to blogging mode! You can Publish, Publish as draft, Insert your categories , Open existing posts, set up new blogs and even insert HTML objects like pictures, links and much more! You can even create image effects and drop shadows! Cool!
Now create your blog post and when done, click the Publish button. Your post has been published and live!
That's great! Done! :)


Hello there! If you are new here, you might want to subscribe to the free RSS feed for updates.
Enter your email address:


Delivered by FeedBurner

Copyright © 2009 Laila Rajaratnam. All Rights Reserved Read more Entry>>

Link from one post to another post in the same blog

Would you want to link a certain post to another post in the same blog? Actually it’s really simple as a pie! The first thing you need to do is to enable individual post page (permalink).

To do enable post page :
Go to Dashboard
Click SETTING > ARCHIVING
In the drop down menu for Enable post pages? - set to Yes
Click Save setting.


Now each  your blog post will have an individual post and a unique URL. Good!

Now, to link the post you want , you need to get the URL of that individual post page.
To get the URL of the individual post :
Go to Dashbord> Edit Post .
Click Edit Post and a list of all your posts will be displayed.
Right-click on VIEW on the particular post you want to link to.
Select Copy link location (this is for FireFox. Wording may be different for other browsers)


Open Notepad and paste the URL  there.
Next,highlight the text in your post in the post editor, that  you want to be displayed as the link and click on the Link icon.
An Edit Link  dialog box will pop up.


Type in the url of your post saved in the notepad.
Click OK. Your post has been linked to another post in the same blog! :)
That’s it!

Like this post? Why don't you subscribe to the free RSS feed?
Enter your email address:

Delivered by FeedBurner
Read more Entry>>

Friday, November 13, 2009

Customize Word 2007 Ribbon

Do you feel that Word 2007 Ribbon is taking up too much space on your desktop ? Would you rather have one toolbar displaying only the most frequently used commands? Well, you can set up Word 2007 to do just that!
The Ribbon 


First, to hide the Ribbon, open Word, press Ctrl and F1 or double-click the Home tab. The Ribbon will disappear from view, leaving only the Ribbon tabs and the Quick Access toolbar visible on the screen.
When you want to use a certain command on the Ribbon, click on the appropriate tab and it will display its Ribbon group. When you are done with the command, click on the tab to hide the Ribbon again.
You can customize Word 2007 Ribbon by adding certain commands that you frequently use, to the Quick Access toolbar.
Just follow these simple steps to customize the Word 2007 Ribbon.
1. Click the Customize Quick Access Toolbar button found to the right of the Office button.


2. Click More Commands.


3. In the Choose commands from box, click the drop-down arrow and then click All Commands.
4. Click the feature you want.
5. Click the Add button and click OK.
Yes, you're done! You have customized the word ribbon to your needs!


Do you want to format without the Ribbon? Well, by right-clicking any part of your document will bring up a shortcut menu of formatting commands that relate to the part of the document you clicked.


Also, for instance, right-clicking the footer will display the Edit Footers shortcut menu.


The Mini Tool Bar
The Mini tool bar, offering a group of the more commonly used commands displays automatically when you point the cursor to a selected highlighted text. The mini tool bar will appear faded and if you point the cursor at the mini tool bar, it becomes solid and you can select a command to use.


This option is a real time saver! You don't have to switch to the Home tab each time you have to perform related tasks. The mini toolbar sometimes disappears and to get it back, reselect the text or right click the selection.

If don't want the mini tool bar,you can disable it:
Click the Office Button > Word Options > Popular, and uncheck Show Mini Toolbar on Selection.


That's it! 

Note:   You cannot customize the Mini Tool bar.

Like this post? Why don't you subscribe to the free RSS feed?  
Enter your email address:

Delivered by FeedBurner


Read more Entry>>

Thursday, November 12, 2009

MS Word 2007

I know that it is a little late in the day to be raving about Word 2007! But then, I was so very into Office 2003 and contented that I was just cruising along with that antique version. Fortunately my computer was struck by a virus about 2 weeks ago and I had to reinstall windows and reluctantly upgraded to Office 2007.WOW! What an upgrade! It’s too good! Amazing! Now I am kicking myself for not upgrading earlier. And of course, Office 2010 is already around the corner!

What can one say about Word 2007? It’s awesome!

The old Menu and Toolbars have been replaced with the new Ribbon. The Ribbon makes accessing your fav tools so very easy! Once you are familiar with using the ribbon in Word 2007, you will find the switch to all the other products in Office 2007 a snap , as  the Ribbon is common to Excel, Powerpoint, Outlook, Access etc.
 The Ribbon


The other new concepts in Word 2007 are the :

    *  Mini Toolbars

    * Quick Access Toolbar

    * Key Tips

    * Office Button

    * Styles

    * Themes

    * Building Blocks

    * Publish

    * Content Controls

    * SmartArt

And many more...

Themes allow you to change the entire look of a document with just a few mouse clicks whereas Building blocks let you to create reusable content and Quick Styles helps you to enhance the pictures you Inserted with effects like drop shadow ,borders and more.

However, the icing on the cake is the Live Preview function, which lets you to see how the document looks, when you hover the cursor over any of the ribbon's design elements, such as fonts in Word or charts in Excel.

The relocation of your favorite features in Word 2007, can easily be mastered and you can enjoy all the new features Word 2007 offers! Read more Entry>>

Wednesday, November 11, 2009

Publish Blog Post via Email or Mobile

Publish blog post via email or mobile ? Well yes, you can publish your blog post by email or mobile! The Mail-to-Blogger feature in blogger enables you to publish your blog  post via email. But then, first you need to make a tiny change in your blog setting.

Just follow these simple easy  steps.

1. Go to Settings >E-mail & Mobile >Posting Options.


2. Fill in the Mail-to-Blogger email address. It should read like this :- username.secretword@blogger.com. Note that this email address should  be kept as a secret or anyone who has this mail id, would be able to post to your blog.
3.Finally, choose one of the 3 options:
 •Publish emails immediately
 •Save emails as draft posts
 •Disabled
Be sure to choose - Publish Emails Immediately. If this option is not checked, then your posts will be saved as drafts and will not appear on your blog till you log on to Blogger.com and publish them yourself.
4.For Mobile devices: Click Add Mobile devices.
The following dialog box will open.Send the verification code from your mobile device.Yes,Done!


 5. Click Save Settings.

That's it! Now you are  ready to send blog posts by email or your device. The subjects of your email letters will be the titles of your posts, and the body of the emails will be the posts . To include an image in your post, you can attach an image to your email.
Note:
 Sometimes email programs append text to the bottom of each sent message. Hence, fix # at the end of your post! Done!  :) Read more Entry>>

Saturday, November 7, 2009

iConcertCal - An iTunes Plug-In for iPhone

iConcertCal is a free iTunes plug-in that scans your music library and if any of the artists in your music library are playing concerts  in your area, they will automatically show up in a "My Shows" list. It supports searches in the US, Canada, and the UK and is available for both Windows and Mac OS X.

iConcertCal (http://www.iconcertcal.com/iphone.php) or 
is now available for the iPhone! Using the new features in the APIs of iPhone OS 3.0, it checks all the artists in the iTunes library of your iPhone, uses the built in GPS to find your location and then displays results. You can update your preferences and edit your location and the radius in which you’re willing to travel to see concerts. iConcertCal will show you all concerts playing in those locations and radius! Cool!
Each concert listing has:
  • links to purchase tickets
  • an email option to send a reminder to yourself or to alert your friends about a concert
  • a built in map to the venue with directions
  • a preview button that will allow you to listen to what each of the bands sound like to help you decide if you want to go
So,what happens if your largest iTunes library lives on another computer? Well, then,you should go to their website ,on the computer containing your largest library, and set up an account. All the artists on that computer will be indexed. Next go to the app and use the same settings. Automatically all the artists on the computer will be transferred to the iPhone app whether or not the artists are on the iPhone, and that information will be used by the iConcertCal app.


Enjoy this cool plugin! :)

Like this post? Why don't you subscribe to the free RSS feed?
Enter your email address:


Delivered by FeedBurner
Or,maybe,subscribe for free updates in a reader.

Subscribe in a reader

Read more Entry>>