Monday, August 31, 2009

How to Save or Back up Widgets in Blogger

There are many methods to back up blogger widgets, but I am going to show you just the easiest one, which does not require you to play around with css codes and edit html templates.
Before you start, I would suggest that you take a screenshot of your blog with the widgets or maybe even the Page Elements page, so that you know exactly where the widgets or page elements are placed in your old template.

Now, to back-up all the widgets, do as follows:

  • Log into your blogger account.
  • Go to Dashboard .
  • Click on Layout. The Add and Arrange Page Element window will open up.

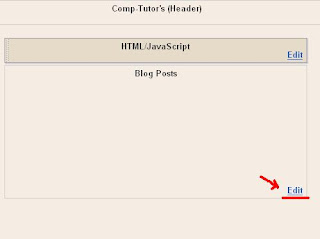
  • You will see an Edit option on each of the widget's right-bottom corner.
  • Click Edit.

A pop-up window will open and you will find some codes there. Copy the code and save them to a notepad file. Name each block of codes with the title of that particular widget. This is because, when you reinstall the widgets, it will be easier for you to realize which code belongs to a particular widget.


Back-up all the gadgets, in this similar manner and save them all in a notepad file.

You do not need to back-up the following widget codes as they are the default gadgets to your blog and will be automatically uploaded to your new template.

  • About Me gadget
  • Followers gadget
  • Archives gadget
  • Label gadget

Yes, thats it! Done! Your widgets have been saved.

To install the widgets, go to the Add a Page Element page, click on Add a gadget and copy the codes. Done!Your widgets are back in the new template! Cool! :) Hope this was useful to you! Read more Entry>>

How to Install Blogger XML Template

Are you sick and tired of the usual templates supplied by blogger? Well, you can always go in for those wonderful, amazing customized XML templates available on the internet! Switching over to those xml templates from your current template is really a breeze! You can have it, all up and running in a matter of minutes!

Choose and download the template of you choice to your computer. If the template is in a zip file, then, unzip it and extract it. Next, if you have loads of widgets in your present template you can Save the Widgets before installing the Xml template or if you not care about losing those widgets, just move on to the following steps.

  • Log in to your Blogger dashboard and go to Template> Edit Html.
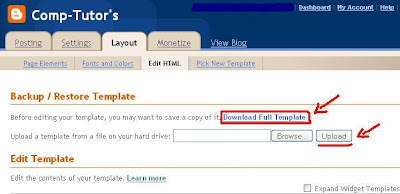
  • Back up your template by clicking on the "Download Full Template" and save it in your hard drive.(In case something goes wrong ,you will always be able to upload your original template.)
  • To “Upload a template from a file on your hard drive" :Click the Browse button and enter the location of your xml template file.
  • Click Upload .The Html of your new template will now appear in the box below.


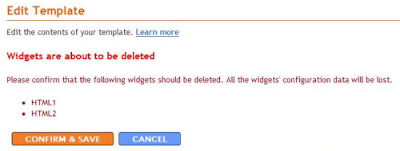
If you are using the new template for the first time ,you can click on the Save Template button. But then, if you have some widgets in the old template you will get a message like this:

Let's say that you do not want the existing widgets, then go ahead and click on the “Confirm and Save” button . But, on the other hand, if you want all those widgets or Page Elements then follow this tutorial.

That’s it! Your new template has been uploaded successfully! Have fun changing your templates!:) Read more Entry>>

Tuesday, August 25, 2009

Nokia Booklet 3G -mini laptop

There’s good news for Nokia fans! Nokia has finally announced a very real 10-inch mini-laptop or netbook called Booklet 3G.
Running an Atom Z530 processor instead of the more common N270, it also has:
• An HDMI port
• Wi-Fi
• 3G (obviously)
• A Webcam
• An SD card reader
• A-GPS and maps integration
• Bluetooth
• A12-hour battery life
• A 2cm (.78 inch), 2.7lb aluminum body that's sleek and sophisticated.
The Booklet 3G also runs Windows -as to whether it's Windows 7, Nokia isn't announcing it as yet.


The other unique feature of Nokia 3G Booklet, is its integration with Nokia's Ovi tools, maps, music store, and cloud-based Ovi Suite. Nokia has yet to make public how much software it will be adding to Windows , but then it would be a cool idea to add a great deal of their mobility-assisting software as possible.
The price or launch date has not been announced yet and Nokia plans to disclose a lot more on September 2.
More more info ..check out Nokia's Press release.


Read more Entry>>

Sunday, August 23, 2009

Nikon COOLPIX S1000pj with built-in Projector

Nikon’s COOLPIX S1000pj is the world’s first compact digital camera to feature a built-in projector. The camera projects your favorite photos or movies clips on any flat surface at up to 40 inches in size. Pictures can be projected individually, or as slide shows complete with music and added effects. Thus, it enhances the fun of sharing pictures and special moments anywhere.

A handy projector stand is included along with a remote control that can be used to operate the projector, release the shutter, and more. Apart from the micro projector, the rest of the S1000pj features the usual standard point-and-shoot capabilities.

Its features include:

  • 2.7- high-resolution LCD monitor with anti-reflection coated cover
  • 12-megapixel sensor
  • 5X zoom lens
  • 16 shooting modes
  • Four different movie modes.
  • Active Zoom
  • Approx. 36 MB of internal memory
  • Hi-Speed USB connectivity
  • Projector Brightness up to 10 lumens
  • Image size 5 to 40 in

The camera’s weight is approx. 155 g (5.5 oz.) without battery and SD/SDHC memory card

Supplied accessories - Rechargeable Li-ion Battery EN-EL12, Battery Charger MH-65, USB Cable UC-E6, Audio Video Cable EG-CP14, Strap AN-CP19, Projector Stand ET-2, Remote Control ML-L4, Software Suite CD-ROM

System Requirements:

OS Macintosh: Mac OS X (version 10.3.9, 10.4.11, 10.5.6, 10.5.7)
Windows: Preinstalled versions of Windows Vista Service Pack 1 (32-bit Home Basic/Home Premium/Business/Enterprise/Ultimate editions), Windows XP Service Pack 3 (Home Edition/Professional)

Note :CD-ROM drive required for installation. Only built-in USB ports are supported.


Nikon COOLPIX S1000pj will be available in Black or Warm Silver and will be released in mid-November at an expected retail price of $429 (£252).


Read more Entry>>

Saturday, August 22, 2009

Disable Right Click on your Blog

Are you terrified that the unique content and those amazing graphics or pictures on your blog will be copied? Don’t panic! :) You can disable the right click on your blog and protect the contents and images on your blog! Cool. Actually it is a widget and it is so very easy to install!
Just follow these simple steps:

Step 1:
Go to Template -> Page Elements.
Step 2 :
Add a Page Element -> then Add a HTML
tep 3 :
Now just copy and save the following code into Html

<script language='JavaScript'>
<!--

//Disable right mouse click Script
//By Maximus (maximus@nsimail.com) w/ mods by DynamicDrive
//For full source code, visit http://www.dynamicdrive.com

var message="No Right-Click!";

///////////////////////////////////
function clickIE4(){
if (event.button==2){
alert(message);
return false;
}
}

function clickNS4(e){
if (document.layers||document.getElementById&&!document.all){
if (e.which==2||e.which==3){
alert(message);
return false;
}
}
}

if (document.layers){
document.captureEvents(Event.MOUSEDOWN);
document.onmousedown=clickNS4;
}
else if (document.all&&!document.getElementById){
document.onmousedown=clickIE4;
}

document.oncontextmenu=new Function("alert(message);return false")

// -->
</script>

Yes, you are done! Right click on your blog has been disabled! 

Enjoy this hack ! Read more Entry>>

Thursday, August 20, 2009

Add HTML Codes in Blogger Post

Do you want to write some Html codes in your blog post? If so, first you would have to make a few simple changes to your blogger template so that it is able to resist any codes in the post. If you do not make the changes in the template, the Html code in your blog post will merge with the codes in the basic blogger template and you would not be able to view any codes in your post.

Hence, to make some changes in your blogger template , you would have to add a few CSS codes to your template.

Step1 :

Go to Dashboard> Layout >Edit Html.


Step 2:
Click on "Edit HTML " Tab and it will open up a new window .
Step 3:

Now Search for this Code: ]]></b:skin>
(Check out here to locate a code easily in the Template)

Add the following Code just above the ]]></b:skin> code.

pre
{
background:#efefef;
border:1px solid #A6B0BF;
font-size:120%;
line-height:100%;
overflow:auto;
padding:10px;
color:#000000 }
pre:hover {
border:1px solid #efefef;
}
code {
font-size:120%;
text-align:left;
margin:0;padding:0;
color: #000000;}
.clear { clear:both;
overflow:hidden;
}
Step 5:

Save Your Template.

Done! Now, your blog is ready to show HTML codes in every blog post. Awesome, isn’t it? Also,it is so very easy.

There is still one more step you would have to follow, to show Html codes in blog post.
While writing your post , go to Edit Html section of your post and add <pre>before and </pre>after the codes.

Like this: <pre>Your Codes Here</pre>

That’s it! Your Html codes will show in your Blog post! :) Read more Entry>>

Wednesday, August 19, 2009

Modify ‘Comments’ and ‘Posted By’ words in Blogger

Do you think that ‘comments’ and ‘Posted by’ words in blogger are so very common and conventional, that you would like to customize it and use a cool word of your own .Well, that’s no problem !It’s a breeze actually! Oh, no, you do not have to go about tweaking the template and stuff like that.

1. Go to the Page Elements tab on your dashboard.
2. Click on the word Edit in the Blog Posts section.


The Main Page Option box will appear.


  • Delete the word comments and insert whatever word you would like. Like for instance, you can replace the word ‘comments’ by’ ‘fantastic bloggers’.
  • Likewise, for the posted by word, delete the words 'Posted by' and insert your desired word. You can substitute it by ‘written by’ or whatever.
  • Click Save Now.
Yes, you’re done! Simple wasn’t it? Read more Entry>>

Tuesday, August 18, 2009

Schedule your posts in Blogger

Are you off on a vacation? Are you worried that the regular postings on your blog will be disrupted? No worries. You can schedule your posts so that they will be published on the date and time you set. Cool. How do you do that? It’s so very simple.
To schedule a post:

* Write your post.
* When done, click Save Now.
* Click on Post Options (located at the bottom of the 'edit post' page)

  • Enter whatever time and date that you would want your post to be published.
  • Click Publish Post.

Your post will be automatically published on that date and time.

Well.. wasn’t it a breeze? :) You can enjoy your vacation with no worries as your blog is being updated automatically!

Read more Entry>>

Friday, August 14, 2009

Make Strikethroughs in Blogger

Whats a strikethrough? Well, it's where you write a word and then go back and put a line through it, most often purposely, just for the fun of it! Like this:

Why must should I have strikethroughs in my blog?

This is what you do:

Click on the Edit Html as you are writing your post.
Put in front of the text that you want the line to go through.

Put
behind it. The backslash is very important.

Thus, when you click on the Edit Html tab, this is how the above sentence will look.

Why must should I have strikethroughs in my blog?

WOW!Isn't this real cool!Well, go around playing with strikethroughs in your blogs!:)


Read more Entry>>

Wednesday, August 12, 2009

Add 'Read More' Expandable Post Link in Blogger

'Read More' Expandable Post Link or the Expandable Post Summaries are post teasers which shows just the first paragraph of the post instead of the entire post on the front page of your blog!And the reader can click on the ‘Read More’ link to see the full post. These allow the reader to get a small introduction to each post on the main page.

This hack is very useful if there are long articles on one page. Blogger blog does not have this feature available directly from the dashboard, so, you have to follow the 3 basic steps order to implement the expandable post summaries in the new layout blogger template.

Note – Before you start to tweak your template, you will first have to:
  1. Enable post pages .
Go to Settings >Archiving and Enable post pages to Yes.

2. Add a Class Tag in your default post template:

Go to Settings > Formatting and scroll all the way down to the bottom. In the last option Post Template paste in the following code:

Keep some space between the tags and Save .

Then, you better take the following 2 precautions:

1. Copy and paste your existing code onto a notepad or any text editor.

2. Create a backup of your template just in case something goes wrong.

Now for the template tweak for Read More link:

Step 1- Style your CSS. This changes how posts display on different pages.

* Login to your account.
* Go to 'Template'
* Click 'Edit HTML'
* Check 'Expand Widget'

Scroll down just above </head> and add in this code:

<style>
<b:if cond='data:blog.pageType == &quot;item&quot;'>
span.fullpost {display:inline;}
<b:else/>
span.fullpost {display:none;}
</b:if>
</style>


You will see a tag ]]></b:skin> just above the </head> tag.
The above code should be placed between these two tags. We have defined a class called 'fullpost'.


Step 2 - Add Read More links which will appear after the paragraph summaries.

* Scroll down the code and locate this code- .

Add the code below immediately after the above code :

<b:if cond='data:blog.pageType != &quot;item&quot;'>
<a expr:href='data:post.url' target='_blank'>Read more Entry&gt;&gt;</a>
</b:if>


When done,save the template . You should see that the Read More Entry>> appearing on your blog. To locate a code in the template follow this easy method.

Step 3- Create a New Post

Everything is set. Now test it out. When you click on the New Post tab, you will see that the post text area has a <span class="fullpost"> and </span> tags. If not, then redo step2.
Write your new post and anything you put above the <span class="fullpost"> tag will be the teaser text. At the end of the post put in the </span>tag.

Yes, your 'Read more' link is all set and working!:) Go for it!

I prefer not using the 'Read More' link in this blog as I read somewhere that when you have loads of screenshots,it is better to have full posts since it is better for Google SEO.(Psst..I'm still not familiar with SEO!:)) Anyways its up to you, to use Read More link or not!

Copyright © 2009 Laila Rajaratnam. All Rights Reserved
Read more Entry>>

How to locate a code in the Template

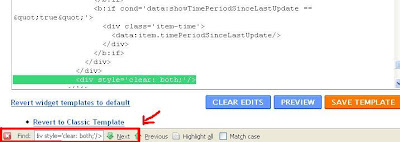
Isn’t scanning long lines of codes in the template a real pain? There is a real cool shortcut to find a code in the template .Just press ctrl+F and a Find [ ] will appear at the left of bottom of the browser. Type all or part of the code you are looking for in the Find box. The scrollbar will scroll down to the part where the code is located and highlight it. Like this:


That’s it! Now you can do whatever editing and preview. If everything seems OK, click Save Template and View Blog to check out that everything is OK!

Read more Entry>>

Sunday, August 2, 2009

How to view your IP address

Would you like to know your public IP address? Well, there are many ways to determine your IP address. Here are a couple of methods:

By using IPCONFIG command

1. Click Start and select Run

2. In box that appears type cmd and click OK

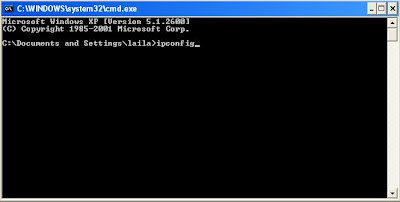
3. The Dos box will appear. Type in it ipconfig and press enter.

4. Your IP will be shown.


Good!Now for another method!

By Network Connections status

1. Click Start and go to the Control panel.

2. Click on Internet Connections.

4. Select your connection icon, and click on it .

5. Click on Details tab, and you will see your IP address.


Sometimes depending on your network configuration or if you are behind a firewall or router, you will not be able to see your public IP.In that case, you can see your public IP address in www.see-my-ip.com or download and a free utility called BySoft Network Monitor and you will be able to see your IP address and other information about your connection as well! Read more Entry>>
Saturday, August 1, 2009

How To remove unwanted StartUp Applications

Does your computer take ages to start up? Do you feel that you can whip up a meal before your windows start? Well, maybe there are many unwanted programs running on Windows StartUp. Some programs do not even offer the option “do not start with windows”. Is there a way to disable the unwanted applications when windows start? Of course, it is possible to disable programs that you do not want at the startup, by using “System Configuration Utility”

Follow this simple method to Disable StartUp applications:

1. Click Start then select Run.

2. Type msconfig and click OK. System Configuration Utility will start.

3. Select the Startup tab. You will see the list of all startup programs with their location.

4. Uncheck programs that you do not want to start with Windows. Be cautious and do not uncheck items that you are not familiar with.

5. Click OK.

6. You will need to restart your computer

Yes, that’s it! The next time your system starts, there will be a notification “You have used the System Configuration utility to make changes to the way Windows start”. You have successfully removed unwanted programs running at windows start up!

Read more Entry>>