Sunday, March 29, 2009

Wi-Fi or Wireless networks

What is Wi-Fi or Wireless Networks ?It is a technology that accesses internet at high speed called broadband without the need for cables. It uses short range radio waves to transmit internet connection in all directions.Wi-fi is used at home, offices and public places like airports, cafes and malls called Hotspots.

To access the network you need:

  • Wireless pc card to be installed in laptops or pc
  • Routers to set up the network
As the routers and cards are sold unencrypted with standard password, the network is left unsecured which other Wi-Fi users can get connected without identifications or passwords .

Hence,you should take certain precautions to your network from intruders:

1. Each wireless router is sold with the manufacturers default user name, SSID (Service Set Identifier), password, and IP address for easy installation. These passwords should be changed immediately before they are connected to the network, to reduce the possibility of getting connected to a casual user's laptop which is configured to connect to any available network.

2. Your Wi-Fi network by default broadcasts its name to all wireless users within range and must be disabled to be made invisible to intruders.

3. Turn on the encryption. Without the key, encryption will not allow anyone into the network.

4. There are two types of encryption standards :Wireless Equivalent Protocol (WEP) and Wi-Fi Protected Access(WPA). WPA is more secure than WEP as WPA has a powerful security technology with 128-bit encryption keys to ensure the network's privacy and security.

5. Enable Media Access Control (MAC) address so that only computers with the specific MAC address will be authorized to access the network. But then, you must specify the addresses that are to be allowed.

Furthermore, to prevent radio signals from transmitting through the walls,"Wi-Fi proof paint" can also be applied to the walls. Finally, internet users must protect their computers by installing anti-virus software and personal firewalls to avoid being impersonated by unauthorized users.

Copyright © 2009 Laila Rajaratnam. All Rights Reserved.

Read more Entry>>

Convert YouTube Videos to Flash for PowerPoint presentations

Flash movie files which has the .SWF extension are small in size and hence, they are perfect to use in PowerPoint presentations and on Web sites as well. Flash movies are animations and are usually produced in the program Adobe Flash , tho’ certain other programs can save or export their finished products in a Flash movie format.

To convert YouTube videos to Flash for PowerPoint presentations you have to:

1. Download YouTube videos to your computer
2. Then, convert the downloaded YouTube videos to Flash format .

There are many softwares available to download and convert these YouTube movies, but ,I use this amazing tool from dvdvideosoft.com which does everything you need and much more.They have many free softwares, but you can select just the following programs from the list.

1. Free YouTube Download

2. Free Video to Flash Converter

First, download and install the programmes

A new shortcut will appear on your desktop, called Free Studio Manager. This shows the complete list of programs that are available from dvdvideosoft.com. You can just install only these two programs , by simply clicking on the appropriate link.

To download YouTube Video

  • Open the YouTube downloader.
  • Paste the URL of the YouTube video in the Input YouTube URL text box.
  • A file path and default file name will be entered automatically in the Output to: text box.If you want to select a different folder click the Browse button and type a new file name for the video.
  • The program will mechanically add an extension of .AVI to the file name. You can choose .FLV file extension if you wish.
  • Click >Download .

The new video file is downloaded to the folder you selected .
That’s it!

This .FLV or .AVI video file still cannot be embedded into PowerPoint. You have to convert this downloaded YouTube video to a SWF file, which is the format supported by Adobe Flash.

Now convert the downloaded video to SWF File Format

  • Open, Free Video to Flash Converter .
  • Click Browse and locate the YouTube video file you downloaded.By default, the program will complete the Output Video file text box. Browse to a different folder if you want.
  • Using the Formats drop down list, make sure to select SWF as the file type

Optional: Click >Trim , to select a specific portion of the YouTube video to convert, if you wish.

By default, the box is checked beside Show HTML example file after conversion. This will save your converted video also as an HTM file, and will open a browser window showing the video. You may choose to skip this step by removing the checkmark.

  • Click the Convert button


Your video file is converted to SWF file.

Done! Your YouTube video has been converted to flash format ready to be embedded in your PowerPoint presentation! :)


Copyright © 2009 Laila Rajaratnam. All Rights Reserved.

Read more Entry>>

Thursday, March 26, 2009

Convert PowerPoint Presentations to Word Documents

Lets say that you have made this amazing Powerpoint presentation! You want a second opinion from your know-all friend or may be your boss is in another city and wants to take a look at it before the big presentation day. May be ,this is a business presentations which ought to be approved or edited by others in your company .So then ,how do you send it for review? Sending the Powerpoint by mail is so very cumbersome as the file size will be huge because of the graphics, music etc. inserted. So, what do you do? Simple! Convert it to word document and mail it. Convert PowerPoint to Word? Yes, it’s possible and moreover it is a very quick and easy process! :)

Open your PowerPoint presentation:

• PowerPoint 2007 - Click on the Office button > Publish > Create Handouts in Microsoft Word

• PowerPoint 2003 - Choose File > Send to > Microsoft Office Word


The Send To Microsoft Office Word dialog box will open.

You have 5 options for the page layout.

Choose which ever suits you.

Since,after the conversion , the Word document will contain thumbnail versions of your slides, you can choose the page layout option best suited to you!

Important note:
This is also a quicker way to create printed handouts for the audience to jot down notes during presentation!


When PowerPoint converts your presentation to a Word document there is also the choice of Paste or Paste Link . Here is the difference:

• Choosing Paste will simply create the handout in the style you have chosen.

• Choosing Paste Link will create a handout in the style you choose as well,but,if the PowerPoint presentation is edited later,the next time you open the word document , the Word also has those changes!

When done,Click OK.

Your presentation will be converted to word document with the slide thumbnail on one side and your page on the other box!


That's it!Done!You can use these converted documents either as printed handouts or you can mail them to whoever! :) Read more Entry>>

Tuesday, March 24, 2009

Embed YouTube Videos in PowerPoint -Offline Mode

There are 2 options to incorporate YouTube videos into your Powerpoint presentations:
  1. You can link the YouTube videos (you will need a good internet connectivity to view this presentation).A step by step tutorial is available from here.
  2. You can download and embed the YouTube videos (by this option you can view the presentation offline)
Though the first option is so easy, the second option is safer and more reliable as you do not need internet connection and moreover,you need not even bother whether the internet connection speed is good or not!
There are many methods to download YouTube video to your computer and then embed it in Powerpoint slides, but the following method is so very very easy!

All you have to do is to use an online converter, type in the URL of the YouTube video, convert the file to windows media format and save it to your hard disc.Thats it!
  • The Conversion wizard will appear.
  • Type the URL (web address) of the YouTube video.

In the next step, choose the file type to convert to.You should choose wmv(windows media format)

In the next step, you can choose whatever additional options or you may just skip this step.

Now, the conversion wizard downloads your file.


The last step is to click the Download Now button.

Now save the video file to wherever you want to, preferably to the same folder which contains your Powerpoint file ,in your hard drive.


To embed this video to your Powerpoint slide-

Open your Powerpoint presentation
Choose Insert –> Movie from file
Click the video file and click OK.
That's it!Your video file has been embeded in your powerpoint slide.
Choose your options like start automatically or when clicked.
Then right click on the movie and select edit movie object and choose more options of your choice.Done!That's it!

Copyright © 2008-2009 Laila Rajaratnam. All Rights Reserved. Read more Entry>>

Friday, March 20, 2009

Link YouTube Videos to Powerpoint Presentations

You should spice up your PowerPoint presentations with lively video clips to arrest and hold the attention of your audience! You do not have to waste time making your own videos,as there are such great amazing videos in the YouTube website on any topic - whether it is a tutorial, a fun advertisement,a movie , a song clip or if you have your own YouTube video, then ,well and good!:)
You can incorporate these YouTube videos in your Powerpoint presentations and mind you, linking YouTube video to a PowerPoint presentation is just a cake walk! :) Moreover it does add some pizzazz !

There are two ways to use YouTube Videos in PowerPoint Presentations.
  1. You can link the YouTube videos (you will need a good internet connectivity to view this presentation)
  2. You can download and embed the YouTube videos (by this option you can view the presentation offline)
Well, now lets say that you are giving a presentation in a Wi-FIi conference room and the internet connection speed is really fast! Then you can use the first option of just linking the live YouTube Videos directly to your presentation slide.

To link YouTube Videos directly into PowerPoint slide -
You need:
  • A YouTube Video plug-in added to your Powerpoint.
You can download the YouTube Video Wizard plug-in from here
and install it in your computer.

When done,

  • Open PowerPoint
  • Go to Tools,click Add-Ins


The Add New Powerpoint Add-In dialog box will open.
Click the installed Youtube Video add-in and click OK

This will add a new "Insert YouTube Video" command to your PowerPoint Toolbar.

Now you are ready to link the YouTube videos to your Powerpoint Slide!

Next,
Click>Insert in your Powerpoint presentation
Click>YouTube Video command
The Insert You tube Video Wizard will appear and walk you through the process!


Enter the link to the YouTube video you want to be linked, from the YouTube video browser address bar.

By default, the YouTube video size is set to 50% of the PowerPoint slide. This is usually the best size to use. You can set any size you like for the video to play, but then, choosing a larger size will show some distortion in the video.

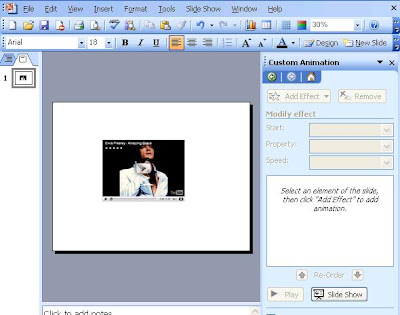
When you are done , click the Finish button. The YouTube video will be imported into your PowerPoint presentation. You will see large X in the center of your PowerPoint slide.This is a
YouTube Video Placeholder which the YouTube video wizard inserts on your PowerPoint slide.


To see the YouTube video in action, you must watch the presentation as a Slide show.

1. Choose Slide Show > View Show or press the F5 key on your keyboard.

2. Press the Esc key to exit the slide show.


Note - It is important that you have a live internet connection in order to view the linked YouTube video in your PowerPoint presentation!

This YouTube video is not embedded into the presentation, but is simply linked to the web!
Was'nt this so very easy? :) Try it! Read more Entry>>

Tuesday, March 17, 2009

My 100th Post!

MY 1ooth POST!!

A big Thank You to Everyone who have visited my blog regularly and subscribed to my RSS feeds!:)


A special THANK YOU to TITECH weblog for all the encouraging supportive comments and helping me out at times!! :)

A big Thank You to Denny Lyon of the Romancing The Chocolate
for publishing my article 'I am not a chocoholic' on her blog.

To Joeshico of WhyWine Blog for fav me in Technorati.

To Winddancer for reviewing this blog !

THANK YOU
all once again and please do keep visiting this Blog Comp-tutor :)
Have a great day! :)
Read more Entry>>

Assign Keystrokes to Symbols for MS Word

While working in MS Word, if you want to use a particular symbol frequently, you can assign a shortcut key to that symbol so that you can insert the symbol into your document by just using the keystroke and avoid the Symbol dialog box.

To assign a keystroke to a symbol:
  • Go to Insert Menu
  • Click the Symbol
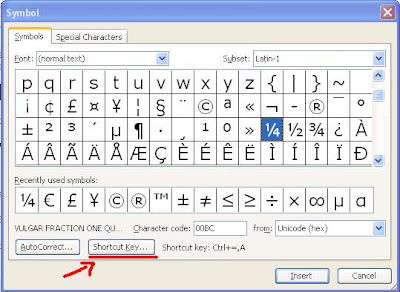
  • The Symbol dialog box will appear.
  • Highlight the symbol you propose to use.
  • Then click the Shortcut Key button.

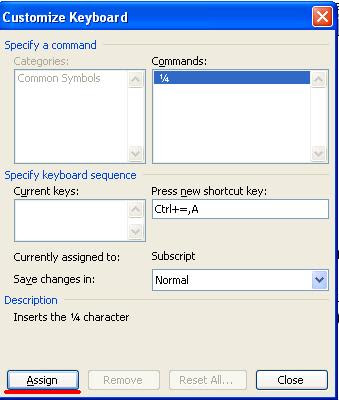
The Customize Keyboard dialog box will appear.

In the Press new shortcut key box, type in the key combination you want to use, like, press ALT+ the desired key.

Click Assign.


After entering a keystroke and you need to change it, hit the backspace key and enter a new keystroke for the symbol.

After entering a keystroke and you need to change it, hit the backspace key and enter a new keystroke for the symbol.

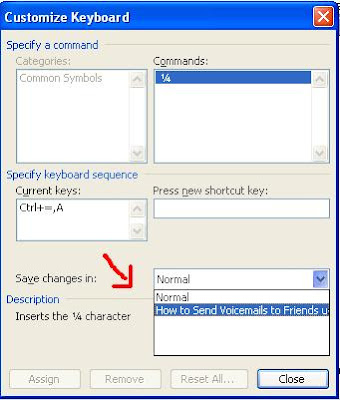
You can save the shortcut key for the symbol either with the Normal template (the default document template) or with the current document.
If you choose the current document, the shortcut key will only insert the symbol when you are editing only the current document.

To make your selection:
Click on the drop down box beside Save changes in and highlight your choice.


Click Assign and Close.

When the Symbol dialog box reappears, click Close or Cancel.

Your Shortcut key is ready for use and your symbol so very handyand easy to access!

Copyright © 2008-2009 Laila Rajaratnam. All Rights Reserved. Read more Entry>>

Monday, March 16, 2009

Inserting Special Characters in MS Word

What are Special characters? They are certain symbols that are not on the Windows keyboard. Like for instance the currency sign for a different country or the copyright or trademark symbols.

To get these and other symbols:
• Go to Insert menu
• Select and click symbol


When the symbol dialog box appears, select the symbol you would like from the display.


• Double click the special character
• Click the Insert button at the bottom of the box

If you do not see the symbol you would like to insert

Click the Special Characters


  • Choose and click the special character you want
  • Then click the Insert button at the bottom of the box.
  • Click Close to return to the document.
The special character that you chose will be inserted in the document at the cursor’s location.

To access some other sets:

Click on the drop-down box beside the Font label.

Scroll down and after several font sets you come to Wingdings.
Find the symbol you would like to insert into your document


That's it!You have whatever character symbols you wish to insert!:)

Copyright © 2008-2009 Laila Rajaratnam. All Rights Reserved

Read more Entry>>

Tuesday, March 10, 2009

Hiding Text in MS Word

Lets say that you have loads of text on a Word document and that you want to print just a portion of that word document or maybe print two different versions of the document. Well its simple and can be done! Oh no, you do not have to have two documents! One document will do ..all that you need to do is just hide the portion that you do not want to print or would not want others to see it! You can always view your hidden text!

To Hide the Text:

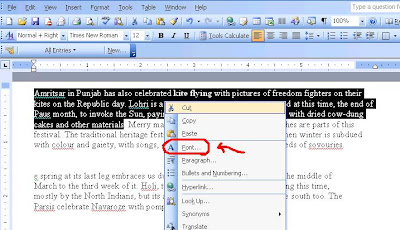
1. Highlight the portion you wish to hide

2. Right-click and select Font

3. In the Effects section, select Hidden
4. Click OK
Your text has been hidden!

Now, if you want to view your hidden text...

All that you have to do is to:

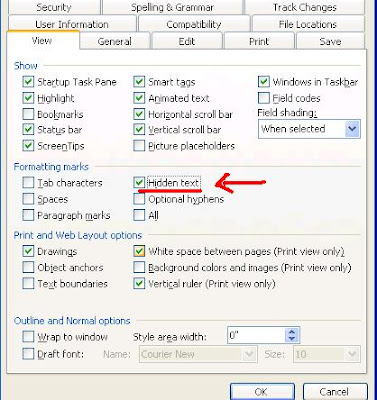
1. Click Tools

2. Select Options

3. Open the View tab

4. Under Formatting marks, select or deselect Hidden


5. Click OK

That’s it! You can hide or display and view your text! :) Read more Entry>>