Tuesday, November 17, 2009

Publish Blog from Word 2007

Did you know that you can publish directly to your blog from Word 2007? Well, that’s one of the new features of Word 2007! You can publish to popular services such as Blogger, Typepad, Wordpress, Windows Live Spaces and others. All that you need, is  internet connection to publish the posts which you have prepared, directly from Word! To start with, you have to create and configure an account in Word and start blogging. You will be able to insert pictures, links, and formatted text as well!

To create and configure an account in Word 2007:
•    Click the Office button > Publish > Blog .


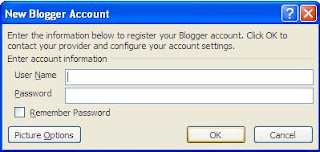
•  As this is the first time the Blog account is set up, click the Register Now button in the Register a Blog Account dialog.


•  In the New Blog Account dialog, select your blog provider- Blogger or WordPress or whatever, from the drop down menu.


  • Provide the login details.

  • If you would like Word to upload pictures for you, click  the Picture Options button.


  • You can choose to have Word publish images directly to your blog provider or to your server, if you or a host is serving your site.

Now, you will notice that the Ribbon has changed to blogging mode! You can Publish, Publish as draft, Insert your categories , Open existing posts, set up new blogs and even insert HTML objects like pictures, links and much more! You can even create image effects and drop shadows! Cool!
Now create your blog post and when done, click the Publish button. Your post has been published and live!
That's great! Done! :)


Hello there! If you are new here, you might want to subscribe to the free RSS feed for updates.
Enter your email address:


Delivered by FeedBurner

Copyright © 2009 Laila Rajaratnam. All Rights Reserved Read more Entry>>

Link from one post to another post in the same blog

Would you want to link a certain post to another post in the same blog? Actually it’s really simple as a pie! The first thing you need to do is to enable individual post page (permalink).

To do enable post page :
Go to Dashboard
Click SETTING > ARCHIVING
In the drop down menu for Enable post pages? - set to Yes
Click Save setting.


Now each  your blog post will have an individual post and a unique URL. Good!

Now, to link the post you want , you need to get the URL of that individual post page.
To get the URL of the individual post :
Go to Dashbord> Edit Post .
Click Edit Post and a list of all your posts will be displayed.
Right-click on VIEW on the particular post you want to link to.
Select Copy link location (this is for FireFox. Wording may be different for other browsers)


Open Notepad and paste the URL  there.
Next,highlight the text in your post in the post editor, that  you want to be displayed as the link and click on the Link icon.
An Edit Link  dialog box will pop up.


Type in the url of your post saved in the notepad.
Click OK. Your post has been linked to another post in the same blog! :)
That’s it!

Like this post? Why don't you subscribe to the free RSS feed?
Enter your email address:

Delivered by FeedBurner
Read more Entry>>