Are you terrified that the unique content and those amazing graphics or pictures on your blog will be copied? Don’t panic! :) You can disable the right click on your blog and protect the contents and images on your blog! Cool. Actually it is a widget and it is so very easy to install!
Just follow these simple steps:
Step 1:
Go to Template -> Page Elements.
Step 2 :
Add a Page Element -> then Add a HTML
tep 3 :
Now just copy and save the following code into Html
<script language='JavaScript'>
<!--
//Disable right mouse click Script
//By Maximus (maximus@nsimail.com) w/ mods by DynamicDrive
//For full source code, visit http://www.dynamicdrive.com
var message="No Right-Click!";
///////////////////////////////////
function clickIE4(){
if (event.button==2){
alert(message);
return false;
}
}
function clickNS4(e){
if (document.layers||document.getElementById&&!document.all){
if (e.which==2||e.which==3){
alert(message);
return false;
}
}
}
if (document.layers){
document.captureEvents(Event.MOUSEDOWN);
document.onmousedown=clickNS4;
}
else if (document.all&&!document.getElementById){
document.onmousedown=clickIE4;
}
document.oncontextmenu=new Function("alert(message);return false")
// -->
</script>
Yes, you are done! Right click on your blog has been disabled!
Enjoy this hack !
Read more Entry>>
Saturday, August 22, 2009


Thursday, August 20, 2009
Add HTML Codes in Blogger Post
Do you want to write some Html codes in your blog post? If so, first you would have to make a few simple changes to your blogger template so that it is able to resist any codes in the post. If you do not make the changes in the template, the Html code in your blog post will merge with the codes in the basic blogger template and you would not be able to view any codes in your post.

Step 2:
Click on "Edit HTML " Tab and it will open up a new window .
 Step 3:
Now Search for this Code: ]]></b:skin>
(Check out here to locate a code easily in the Template)
Add the following Code just above the ]]></b:skin> code.
Save Your Template.
Done! Now, your blog is ready to show HTML codes in every blog post. Awesome, isn’t it? Also,it is so very easy.
There is still one more step you would have to follow, to show Html codes in blog post.
While writing your post , go to Edit Html section of your post and add <pre>before and </pre>after the codes.
Like this: <pre>Your Codes Here</pre>
That’s it! Your Html codes will show in your Blog post! :) Read more Entry>>
Hence, to make some changes in your blogger template , you would have to add a few CSS codes to your template.
Step1 :
Go to Dashboard> Layout >Edit Html.

Step 2:
Click on "Edit HTML " Tab and it will open up a new window .
 Step 3:
Now Search for this Code: ]]></b:skin>
(Check out here to locate a code easily in the Template)
Add the following Code just above the ]]></b:skin> code.
preStep 5:
{
background:#efefef;
border:1px solid #A6B0BF;
font-size:120%;
line-height:100%;
overflow:auto;
padding:10px;
color:#000000 }
pre:hover {
border:1px solid #efefef;
}
code {
font-size:120%;
text-align:left;
margin:0;padding:0;
color: #000000;}
.clear { clear:both;
overflow:hidden;
}
Save Your Template.
Done! Now, your blog is ready to show HTML codes in every blog post. Awesome, isn’t it? Also,it is so very easy.
There is still one more step you would have to follow, to show Html codes in blog post.
While writing your post , go to Edit Html section of your post and add <pre>before and </pre>after the codes.
Like this: <pre>Your Codes Here</pre>
That’s it! Your Html codes will show in your Blog post! :) Read more Entry>>
Wednesday, August 19, 2009
Modify ‘Comments’ and ‘Posted By’ words in Blogger
Do you think that ‘comments’ and ‘Posted by’ words in blogger are so very common and conventional, that you would like to customize it and use a cool word of your own .Well, that’s no problem !It’s a breeze actually! Oh, no, you do not have to go about tweaking the template and stuff like that.
1. Go to the Page Elements tab on your dashboard.
2. Click on the word Edit in the Blog Posts section.
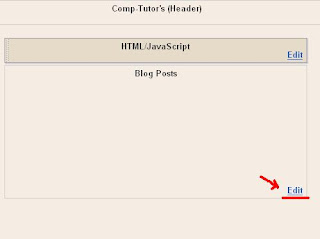
The Main Page Option box will appear.

1. Go to the Page Elements tab on your dashboard.
2. Click on the word Edit in the Blog Posts section.

The Main Page Option box will appear.

- Delete the word comments and insert whatever word you would like. Like for instance, you can replace the word ‘comments’ by’ ‘fantastic bloggers’.
- Likewise, for the posted by word, delete the words 'Posted by' and insert your desired word. You can substitute it by ‘written by’ or whatever.
- Click Save Now.
Tuesday, August 18, 2009
Schedule your posts in Blogger
Are you off on a vacation? Are you worried that the regular postings on your blog will be disrupted? No worries. You can schedule your posts so that they will be published on the date and time you set. Cool. How do you do that? It’s so very simple.
To schedule a post:
* Write your post.
* When done, click Save Now.
* Click on Post Options (located at the bottom of the 'edit post' page)

To schedule a post:
* Write your post.
* When done, click Save Now.
* Click on Post Options (located at the bottom of the 'edit post' page)

- Enter whatever time and date that you would want your post to be published.
- Click Publish Post.
Your post will be automatically published on that date and time.
Friday, August 14, 2009
Make Strikethroughs in Blogger
Whats a strikethrough? Well, it's where you write a word and then go back and put a line through it, most often purposely, just for the fun of it! Like this:
Whymust should I have strikethroughs in my blog?
This is what you do:
Click on the Edit Html as you are writing your post.
Put in front of the text that you want the line to go through.
Put behind it. The backslash is very important.
Thus, when you click on the Edit Html tab, this is how the above sentence will look.
Whymust should I have strikethroughs in my blog?
WOW!Isn't this real cool!Well, go around playing with strikethroughs in your blogs!:)
Read more Entry>>
Why
This is what you do:
Click on the Edit Html as you are writing your post.
Put
 in front of the text that you want the line to go through.
Put
 behind it. The backslash is very important.
Thus, when you click on the Edit Html tab, this is how the above sentence will look.
Why
must should I have strikethroughs in my blog?WOW!Isn't this real cool!Well, go around playing with strikethroughs in your blogs!:)
Read more Entry>>
Wednesday, August 12, 2009
Add 'Read More' Expandable Post Link in Blogger
'Read More' Expandable Post Link or the Expandable Post Summaries are post teasers which shows just the first paragraph of the post instead of the entire post on the front page of your blog!And the reader can click on the ‘Read More’ link to see the full post. These allow the reader to get a small introduction to each post on the main page.
This hack is very useful if there are long articles on one page. Blogger blog does not have this feature available directly from the dashboard, so, you have to follow the 3 basic steps order to implement the expandable post summaries in the new layout blogger template.
Note – Before you start to tweak your template, you will first have to:
2. Add a Class Tag in your default post template:
1. Copy and paste your existing code onto a notepad or any text editor.
2. Create a backup of your template just in case something goes wrong.
Now for the template tweak for Read More link:
Step 1- Style your CSS. This changes how posts display on different pages.
* Login to your account.
* Go to 'Template'
* Click 'Edit HTML'
* Check 'Expand Widget'
Scroll down just above </head> and add in this code:
<style>
<b:if cond='data:blog.pageType == "item"'>
span.fullpost {display:inline;}
<b:else/>
span.fullpost {display:none;}
</b:if>
</style>
You will see a tag ]]></b:skin> just above the </head> tag.
The above code should be placed between these two tags. We have defined a class called 'fullpost'.

Step 2 - Add Read More links which will appear after the paragraph summaries.
* Scroll down the code and locate this code- .
.
Add the code below immediately after the above code :
<b:if cond='data:blog.pageType != "item"'>
<a expr:href='data:post.url' target='_blank'>Read more Entry>></a>
</b:if>

When done,save the template . You should see that the Read More Entry>> appearing on your blog. To locate a code in the template follow this easy method.
Step 3- Create a New Post
Copyright © 2009 Laila Rajaratnam. All Rights Reserved
Read more Entry>>
This hack is very useful if there are long articles on one page. Blogger blog does not have this feature available directly from the dashboard, so, you have to follow the 3 basic steps order to implement the expandable post summaries in the new layout blogger template.
Note – Before you start to tweak your template, you will first have to:
- Enable post pages .
2. Add a Class Tag in your default post template:
Go to Settings > Formatting and scroll all the way down to the bottom. In the last option Post Template paste in the following code:

Keep some space between the tags and Save .

1. Copy and paste your existing code onto a notepad or any text editor.
2. Create a backup of your template just in case something goes wrong.
Now for the template tweak for Read More link:
Step 1- Style your CSS. This changes how posts display on different pages.
* Login to your account.
* Go to 'Template'
* Click 'Edit HTML'
* Check 'Expand Widget'
Scroll down just above </head> and add in this code:
<style>
<b:if cond='data:blog.pageType == "item"'>
span.fullpost {display:inline;}
<b:else/>
span.fullpost {display:none;}
</b:if>
</style>
You will see a tag ]]></b:skin> just above the </head> tag.
The above code should be placed between these two tags. We have defined a class called 'fullpost'.

Step 2 - Add Read More links which will appear after the paragraph summaries.
* Scroll down the code and locate this code-
 .
.Add the code below immediately after the above code :
<b:if cond='data:blog.pageType != "item"'>
<a expr:href='data:post.url' target='_blank'>Read more Entry>></a>
</b:if>

When done,save the template . You should see that the Read More Entry>> appearing on your blog. To locate a code in the template follow this easy method.
Step 3- Create a New Post
Everything is set. Now test it out. When you click on the New Post tab, you will see that the post text area has a <span class="fullpost"> and </span> tags. If not, then redo step2.
Write your new post and anything you put above the <span class="fullpost"> tag will be the teaser text. At the end of the post put in the </span>tag.

Yes, your 'Read more' link is all set and working!:) Go for it!
Copyright © 2009 Laila Rajaratnam. All Rights Reserved
Read more Entry>>
Subscribe to:
Posts (Atom)


