Wednesday, December 31, 2008

The Church Of Google

Hey everyone! Do you go to church regularly? Yes? Then, just skip this page..just kidding! Well, I came across this Google Church .Can you believe it? A Google church! I thought that I would like to share this with you so that more people will become regular Google church goers! :)

Go to The Church of Google ( http://www.thechurchofgoogle.org )

It has The 10 Commandments of Google.
The Prayers of Google .
Check out their About us column about Proof, FAQ and Holiday.
You can even do a Search and get results back from google.
Lets say you want to search for New Year 2009,
Type in New Year 2009 in the search box,
Click Pray
You will be taken to this new window,
Dont Give Up!
Click at the hyperlink 'Click'here,
Viola! Your search results appear! :)
Hmmm..quite fun!
Want regular Church of Google newsletter?Well, then subscribe to the newsletter!
Even if you visit The Church of Google, please do attend the Watch night Service of your place of worship to ring in the New Year! Pray for World Peace! :)
Have a Blessed New Year and do keep returning to my blog through out the Year 2009 ! :)

Copyright © 2008 Laila Rajaratnam. All Rights Reserved


Read more Entry>>

What Is A Spyware

What is Spyware?
Spyware is a computer software programme that is installed clandestinely on to a personal computer without the user's knowledge, to collect personal data and information. This data is sent to advertisers or criminals.

What does Spyware do?
It follows your every movement on the net, just like video cameras follow your movements in the real world at shopping malls, banks, etc. It slyly scrutinizes the user's internet activities and collects various personal information .

Why does Spyware spy on you?
To relay the gathered information to advertisers or other interested parties. Some spyware even record your keystrokes and analyze your password when you next log in to your bank accounts.

How does Spyware sneak into your computer?
Mostly it comes bundled with free software downloaded from the internet. It can originate by clicking on some option in a deceptive pop-up window or from an unscrupulous web site. It can be placed onto your computer remotely by hackers.

What are the symptoms of spyware infection?
Spyware unlike virus does not duplicate itself to other machines. But it slows down the computer and bombards you with pop-up advertisements, even when you are offline. Spyware can change computer settings and home pages.

How to protect yourself from Spyware?
Download and install anti spyware softwares like Ad-aware and SpyBot Search and Destroy which scans your computer, detects and removes the spyware. Sometimes by removing certain spyware, the software which originally installed it might become disabled.

Here are a few helpful tips to avoid Spyware.

*Download programs only from trusted web sites.
*Read all security warnings, privacy statements, and license agreements carefully before downloading free software.
*Never click "OK" or "agree" to close a window. Instead, click the red "x" in the corner top of the window or press the Alt + F4 buttons to close a window.
*Be cautious of popular free movie and music file-sharing programs.
*Do not trust sites that offer pirated programs or adult sites that offer free content. These sites are spyware enticement.
*Install a firewall. It provides a helpful defence against hackers.

Spyware is unlike Adware which is installed with the users permission. Many popular web browsers now have security settings that curb spyware from being installed. The security level should be set to at least medium which is the default setting.

This article was published by Laila Rajaratnam at Helium.Com

Copyright © 2008-2009 Laila Rajaratnam. All Rights Reserved.
Read more Entry>>

Sunday, December 28, 2008

A Weird Google Search Engine

I happened upon this weird and funky Google search engine site.

elgooG, which is Google spelled backwards, is a mirror image of the Google Web site. It is hosted by a popular parody and comedy Web site called All TooFlat.
Go to elgooG (http://elgoog.rb-hosting.de/index.cgi).Your search engine page will show up.


elgooG also features a "hcreaS elgooG" and an "ykcuL gnileeF m'I" button to mirror Google's Google Search and I'm Feeling Lucky buttons. It even has a link to a mirror of Google's Even More page listing Google services.The search box types right to left, and the results display mostly backwards. You can search for words either backwards or forwards.
For instance, lets search for Obama!

You get the results in backwards like this!
Although the site is projected as a joke, it has been maintained for quite a few years and is periodically updated to reflect the changes in the Google Web site. Search results in elgooG are pulled from the actual Google search engine, and then reversed using Python.In fact,some links lead directly to Google services, and others go to a mirror page.

How weird can this be! Well, but if some are having fun and enjoying the site, then, I guess it’s ok! :) Read more Entry>>

Saturday, December 27, 2008

Cooking With Google

Friends coming over suddenly for dinner ? No time for grocery shopping? Do you have just two or three ingredients in your Fridge? Gosh, what shall I do? No worries! Our friendly neighbourhood Google has just the solution for us! There is this awesome Google tool called ‘Cookin’ with Google’ which is based on the concept of cooking with just the ingredients you currently have!

Go to Cookin’ With Google (http://www.researchbuzz.org/wp/tools/cookin-with-google/)
Type in just the ingredients you have, and Google will return the recipe results of only those ingredients!
Thats all! Now you can decide on the refined search results and make your choice of recipe to cook.
For example, lets say that you just have tomatoes, coriander and potatoes. Just type in those ingredients .


Google will return recipes with only those ingredients.
Cookin’ with Google will unearth recipes in several different categories as well for you which includes:
• General
• Vegan/Vegetarian
• Weight Watchers
• WorldWide Cuisine
• Atkins Diet
• Diabetic
• Seafood
• Crockpot


Now, how cool is this? There are also Some Search Tips in the site.Check that out too!

A titbit about Cookin' by Google : Actually this is not associated or produced by Google .This is one of the imaginative and fun tools , programmers have made, using Google's search engine and Google’s huge data! Google promotes this sort of experimentation by giving programmers access to extensive documentation through Google Code. Any one can try their hand at creating Google tools by programming in Python.This tool is originally the brain child of Judy Hourihan, who preferred to search for recipes instead of searching through stacks of recipe books!

Well, Have fun! Happy Cooking!

Copyright © 2008 Laila Rajaratnam. All Rights Reserved

Read more Entry>>

Thursday, December 25, 2008

Google's Image Search

Who does not use Google search? And then, who does not use Google Image search? Yes, but then don’t you get frustrated when you do an Image search for a particular Image and Google returns unlimited, unwanted images. It happens to me all the time. Suddenly, a couple of days back, I came across Google’s Advanced image search and WOW! It’s amazing! It’s exactly what I wanted!
It goes like this!
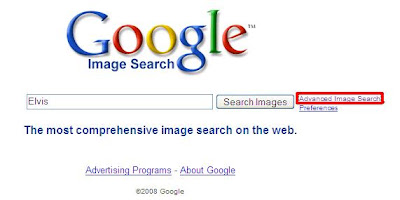
Lets say we want to image search for Elvis Presley!
Type in Elvis at Google Image search and click Advanced Image search.

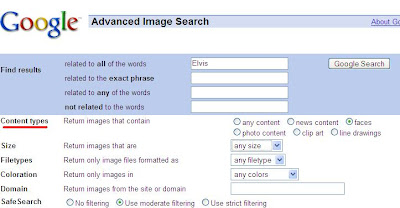
The following dialog box will appear.
It has so many options like Find results, Content types, Size, File type , Coloration ,Domain, Safe Search.
Now,Type in Elvis in whichever column of Find Results.
Choose the Content Types of your choice.
Then select the Size, File type , Coloration from the drop down menu .
Click Google Search. Your results will appear.


For instance if you choose Faces in Content types and type Elvis, Google will return just the faces of Elvis.
Like wise if you choose Photos in Content type, google will return just the photos of Elvis.


In the same manner if you choose, Clipart in Content types only the clipart of Elvis will show up.

Or if you choose, Line drawings in the Content types only the sketches of Elvis will turn up.

Now,how cool is this?We do save so much time and energy by adopting these methods!
By the way, Google always knows what to offer and make matters easier for us! :)

Copyright © 2008 Laila Rajaratnam. All Rights Reserved

Read more Entry>>

Transfer CD Tracks to IPod Using ITunes

Do you want to fill up your iPod with a cool collection of playlists ? What better option than to load it with your fav CDs! It’s a cake walk converting CDs with iTunes and transferring them to your iPod!
First, open iTunes.If you do not have iTunes ,then, download it from here.

Next configure iTunes to encode your CD tracks to MP3 ,AIFF or ACC formats.
  • Go to Edit in iTunes.
  • Click Preferences.
  • Choose the format you want in the drop down Menu.
Choose whatever options you need.


Then...
  • Insert your CD into your CD or DVD drive.
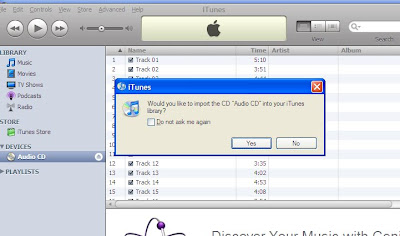
  • You will see the list of tracks in iTunes.
  • The iTunes ‘Import your CD to your Library ‘ dialog box will appear automatically.
  • Click Yes.

  • The Encoding starts.
  • You will see green checks appear alongside each track . This indicates that the track has been successfully imported into your iTunes library.


When done,you will see the songs in 'Recently Added' in the Plylist.
Rename it.

When you double click the 'Recently Added' the following dialog boxes will appear.


If you do not want to create iMix,then fine! Well and good!Your tracks are in your iTunes library!You can now transfer the songs to your iPod! Was'nt this a snap? Everything was done automatically !

Copyright © 2008 Laila Rajaratnam. All Rights Reserved

Read more Entry>>

Monday, December 22, 2008

Rip Music from CDs to Mp3 Using Windows Media Player

Do you have a large collection of CDs? Do you love the music in your CDs so very much that you carry it around where ever you go? Well, is it not quite cumbersome to cart around chunky CDs ? Yes, then, what do I do? Rip your CDs into MP3s and carry as many songs as you want , all in your tiny MP3 devise.

What is Ripping? Ripping is extracting the audio from your CDS to digital formats like MP3.Ripping your CDs into MP3 using Windows Media Player is really a breeze!

The advantages of ripping audio to digital format is that it is convenient and easy to search for your favourite songs instead of having to wade through layers and layers of CDs looking for it. It also allows you to listen to your entire music collection while keeping the originals safe.

Before you start to rip your CDs configure your settings for ripping.I use WMP10
To set your Windows Media Player to rip music CDs:
  • Open Windows Media Player.
  • Go to Tools.
  • Click Options.
  • The Options Menu will open.
  • Click Rip Music.
  • Choose the location for your ripped music in ‘ Rip Music to This Location’.
  • Select the Format - MP3, WMA, WMA Lossless or WAV audio formats .
  • Choose Rip CD When Inserted and Eject CD When Ripping is Complete if you have many CDs to rip in succession.
  • The Audio quality of the output files can be adjusted via a horizontal slider bar. The MP3 file should be encoded with a bitrate of at least 128kbps .
  • Click Apply and then OK button to save and exit .

You have set your WMP to rip CDs.

To Rip Music:
  • Insert CD into your CD or DVD drive.
  • The Audio Cd dialog box will appear.
  • Click on 'The Rip Music from CD using Windows Media Player'
  • Press the OK button.
If you have configured Windows Media Player to automatically start ripping audio CDs as soon as a CD is inserted then all the tracks will be selected; to select only certain tracks to rip you can click on the Stop Rip button, select the tracks you want, and then click the Start Rip button.


If automatic ripping is turned off then ,you do need to either select the entire album (click on top check box), or individual tracks by clicking on each track check box. To begin ripping your CD, click on the Start Rip button.

During the ripping process you will see a green progress bar appear next to each track as it is being processed. When done, a ripped to library message will be appear on the Rip Status column.


If you had chosen to save your ripped music in My Music in My Documents, you can check out to see if it has been saved there!

Or if you had chosen to save your ripped music in your Windows Media Player library, you can check out to see if it has been saved there! Click on the Library tab and in the menu list on the left pane ,click on Recently Added to verify that all the tracks you want have been successfully ripped to the library.


Thats it!! You have ripped your CDs into Mp3 format into your computer! Now, next you have
transfer it to your portable device!

Copyright © 2008 Laila Rajaratnam. All Rights Reserved
Read more Entry>>

Saturday, December 20, 2008

How To Extract Audio From Video

Have you ever wished that a song or the musical background from a movie was so amazing that you could just listen to only the audio in your music player! Well, Of course, it is possible and it is so very easy too! You can extract just the audio from a movie or video clip and create your own MP3 to be played back in your Mp3 player! You can even extract the audio from YouTube movie clips too !

All that you need to create your own MP3 files from video clips are :
  • Audio Extraction Software
  • Video Files
Yes,Thats all! :)
There are many free Audio Extraction Softwares available in the Internet , whereas for this tutorial we are using a simple easy to use audio extractor called AoA Audio Extractor. You can download the free software from here. This software converts AVI, MPEG, MPG, DAT, FLV (Flash Video), WMV/ASF, MOV, MP4, 3GP formats to MP3, WAV, AC3.
  1. Open AoA Audio Extractor.
  2. Click on the Add Files button.
3. The Open dialogue box will appear.
4. Choose the video file and click the Open button.

(If you want to add multiple files then you can use Windows keyboard shortcuts - CTRL+A , Shift+cursor up/down, etc.)

5. The video file will appear in the Audio Extractor.
6. Double-click the video file .
7. In the Output options section, choose an audio format that you want to convert to.

(Keep to the default MP3 format if you're not sure, as this is widely supported on most hardware devices capable of playing digital music.)

8. Set the Audio Sample Rate to 44100 . Files set in 44100 are more compatible with hardware and CD authoring software than with anything higher than 44100.
9.Choose an Output Path to save the audio files to by clicking on the Browse button.


10. Click Start to begin the extraction process.


Yes,that's it! You're done ! You can now play your MP3 in your MP3 device! Enjoy your music!

Copyright © 2008 Laila Rajaratnam. All Rights Reserved

Read more Entry>>

Friday, December 12, 2008

Burn CDs in Windows XP Without Burning Software

Ofcourse,CD Burning softwares are pretty expensive and if you are hesitant to buy one but still have loads of stuff piled in your computer to be transferred into CDs.. Dont be distressed!There is a way out!
You can still burn all your files and downloaded music or whatever you want ,and store it in a CD without fancy CD burner software.CDs can be burnt with just the help of Windows XP’s CD burning support!

All you need to do is to enable the Windows XP built-in burning support.

To Enable Windows XP built-in burning support:

1. Double click “My Computer” icon on your desktop.
2. Right click on your CD/DVD burner icon.

3. Select “Properties” from popup menu.
4. Click on the “Recording” tab.

5. Check the “Enable CD recording on this drive” box.
6.Choose hard drive for temporary files.
7.Set the burning speed.
8. Check the “Automatically eject CD after writing” box.

Now your Windows XP built-in burning support has been enabled and is ready to burn your CDs !
To Burn CDs in Windows XP:

1. Double click “My Computer” icon on your desktop
2. Double click on the CD/DVD burner icon .
3. Drive window will open.
4. From Programmes start Windows Explorer.


5. Drag the files that you want to burn from Windows Explorer to the CD/DVD drive window.
6.Click “Write these files to CD” in CD/DVD drive window.

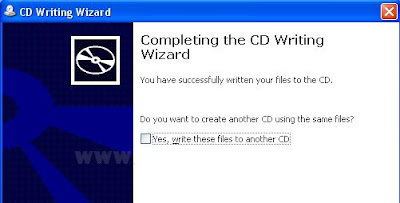
7. The “CD Writing Wizard” will appear.
8. Enter the name for your CD and Click Next


9.Choose whether you want to make an Audio or Data CD.Click Next.


10.Files will be written to CD.


When done,click “Finish”.You can burn another CD if you want to!

Congratulations!!You have burned a CD without a burning software!! Read more Entry>>