Tuesday, November 25, 2008

The Pros and Cons Of VoIP

The Advantages of VoIP
  • You receive incoming calls to your VOIP phone no matter where you are in the world. The caller always dials the same number (that you are assigned, when you sign in with the provider) and you receive the calls in whichever part of the world you are in.
  • Low cost. If you have a broadband Internet connection (DSL or cable), you can make PC-to-PC phone calls anywhere in the world for free. You can make PC-to-phone calls as well which is free of charge .
  • Portability. Carry it wherever you go! While traveling, as long as you carry headset and use your laptop plugged into the Internet, or plug a VOIP phone directly into the Internet connection , can talk to whomever you want for almost absolutely nothing. If you don't have a VOIP phone, use an analog terminal adaptor (ATA) to connect a regular phone to the Internet. An Internet phone is also small and light and hence portable.
  • Features. Usually VoIP comes with a horde of advanced features like call forwarding, call waiting, voice mail, caller ID and three-way calling .And unlike regular phone service these come at no extra charge. You can also send data such as pictures and documents at the same time you are talking on the phone.
The Disadvantages of VoIP
  • There is no service during a power outage. The regular phone is kept in service by the current supplied through the phone line, whereas in VoIP phone, there is no service when the power goes out. But,you can compromise with the use of battery backups or power generators to provide electricity.
  • You cannot make Emergency 911 calls. Traditional phone equipment can trace your location. However, because a voice-over-IP call is basically a transfer of data between two IP addresses and not physical addresses it is not possible to determine where your VoIP phone call is originating from.
  • Because VOIP relies on an Internet connection, bad or unreliable internet connections can result in poor voice quality, such as clipping, voice delay, or dropped calls your VOIP service will be affected by the quality and reliability of your broadband Internet service.
  • In some cases even the limitations of your PC can affect the quality of your VoIP service.
Well, its up to you now to make a decision!

Copyright © 2008 Laila Rajaratnam. All Rights Reserved


Read more Entry>>

Internet Telephony or VoIP

Do you make umpteen long distance and international calls? Hate typing? Burdened with high telephone bills? Do not worry! You can solve this problem! You can come out of the mess!
Internet telephony is your answer! Internet telephony or VoIP (Voice over Internet Protocol) practically eliminates long distances charges. It allows you to make local, long-distance and international telephone calls via the Internet for the cost of a local call. Moreover it allows you to commune verbally, rather than type messages. But then, the audio quality may not be as clear as the regular phone line, but then, you do save pots of money on phone bills.
What exactly is VoIP?
VoIP or Voice over Internet Protocol, is basically telephony services over the Internet using IP (Internet Protocol) network. Instead of using traditional phone land lines to make voice calls , you use broadband Internet connection .Thus you by-pass the telephone company services and charges.
All that you need for VoIP are :
· Broad band internet connection.
· Equip your computer with a sound card and microphone.
· Equip your normal phone with a VoIP adapter called ATA(Analog Terminal Adaptor).
· Use a stand-alone VoIP phone (IP phones has built-in ATA function and connect directly to the broadband modem).
VOIP phone calls can be made three ways:-
1. Computer to computer.
For a computer-to-computer voice connection you need a computer with sound card, a headset consisting of earphones and microphone, and some VoIP software. There are many free software packages available which allow you to connect to any computer running the same software. These types of calls can be made to anywhere in the world free of charge!

2. Computer to Phone.
For a computer to phone connection, you also need a VOIP software, headset,earphones and microphone,whereas the recipient on the other end can use any regular traditional land-line phone or cell phone. These phones are not connected to the Internet.

3. Phone to Phone.
For a phone to phone connection there are two options:-
· Use a regular phone plugged into an ATA adaptor, which in turn is plugged into your broadband modem.
· Use an IP phone or V0IP phone that is plugged directly into your broadband connection. IP phones have built-in ATA function.
Wireless "hot spots" in locations such as airports, parks, and cafes allow you to connect to the Internet and may enable you to use VoIP service wirelessly.
The following are some of the popular free softphones(software telephones)

Skype – This is owned by the Internet auction giant eBay. Computer-to-computer calls are free, but it will cost you to use SkypeOut, a service that let's you call telephones
Gizmo Project- Lets you make free calls to other Gizmo users.
Google Talk - Free internet calls.

Yahoo with Voice Make free PC-to-PC calls when you use Yahoo! Messenger, and worldwide calls for only a few cents per minute.
Vonage - Has taken Internet phone calling mainstream and offers a variety of flat-rate service plans for unlimited calling.
Well, there you are! Yes! You may now chatter away happily with whomever you want and wherever they are!

Copyright © 2008 Laila Rajaratnam. All Rights Reserved

Read more Entry>>

Thursday, November 20, 2008

How To Type Roman Numerals in Microsoft Word

Roman numerals originated in ancient Rome and are still used today in a variety of applications. You will have to use Roman Numerals for creating an outline for a story or report. They are commonly used to number book chapters and on clocks and watches as well.

It’s very easy!! Word will automatically enter Roman Numerals for you and all you have to do is to press the Enter or Tab button to do it.

* Open MS Word

* On the Toolbar, go to Format

* Go down to Bullets and Numbering

* Go to the Tab that says "Numbered"

* And find the one that numbers in Roman numerals. (usually the last one in the top row)

* Hit Enter to start a new topic!


If u need to make a subtopic, after hitting Enter press the Tab key.You can hit the tab key a few times to keep moving left for deeper subtopics!

If you use some other document to type or need information about roman numerals, there are online websites that converts normal numbers to roman digits, and vice versa .You can copy and paste it.

Check out these two sites for converting normal numbers to roman digits.

http://www.novaroma.org/via_romana/numbers.html


http://www.ivtech.com/roman/


The following links take you to The Roman Numerical chart which you can use as reference.

http://literacy.kent.edu/Minigrants/Cinci/romanchart.htm

http://www.gtcocalcomp.com/erc/interwritebackgrounds/roman_numerals_complete.jpg

Another alternative is to use your keyboard with Uppercase I for (1-one)to type in I II III IV V VI VII VIII IX X etc .

Hope this was helpful!


Copyright © 2008 Laila Rajaratnam. All Rights Reserved

Read more Entry>>

Jazz Radio

All ye jazz lovers! Rejoice! There are glad tidings for you! You can listen to non stop jazz music all day long!

There is a free add-on called Jazz Radio for Firefox and Internet Explorer which is real boon to jazz music lovers. Jazz Radio is a toolbar that lets you tune in to over a 100 jazz music radio stations from all across the world! There are just a few radio controls like volume control and switches between the radio stations.

The tool bar looks like this:

You can download Jazz Radio from here:

Jazz Radio for Firefox 1.5.46

Jazz Radio 4.5.18(for Internet Explorer)

The search functions are embedded in Google and there are also quick links to jazz music articles, news, forums , reviews and jazz fans communities. The tool bar keeps you updated with jazz festivals, jazz music, jazz clubs, new jazz artists, and jazz downloads The Jazz Radio also has pop-up blocking, weather forecasting and email notifier on the bar. Apart from all this you can watch jazz video clips from the RSS links as well .This is a real bonus to jazz enthusiasts .

Well, listen to non stop jazz music and enjoy! Happy listening!


Read more Entry>>

Sunday, November 16, 2008

How To Put YouTube Videos Into IPod

Watching videos in the internet is really amazing, isn’t it? They are free as well! There are hundreds of websites that offer video on every imaginable subject. Did you come across a comic clip that had you falling over laughing? Did a poignant life story touch you? Want to replay your favourite portion of a movie or song clip? Maybe watch an alternative view of the world? How about downloading those videos and cherishing it at your leisure? Better still, would you love to put it into your iPod to be carried around? Yes, very much so! It is possible! It is easy!

Remember that Youtube videos are in FLV formats and if you download it to your computer in FLV format, you need a FLV player to view the video. Whereas if you want to put the YouTube videos into your iPod you need to convert it to MP4 format which iPod supports.

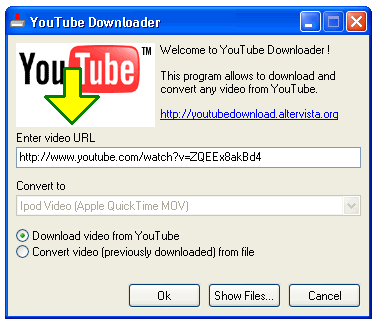
There are many websites that allow you to download YouTube videos into your computer. Actually it is very simple !

1. First, go to YouTube.com.

2. Search for videos that you want.

3. Copy the You Tube URL of the video you want to download.

Next,all you have to do is to enter the YouTube URL of the video you want to download in one of the following websites and hit the ‘Get video’ or 'Download' button. Great! Your video has been downloaded in FLV format to your computer!

These are some of the sites from which you can download YouTube videos.

http://www.techcrunch.com/get- youtube-movie/

http://www.downloadfromyoutube .com/

http://www.downloadyoutubevideos.com/


http://keepvid.com/

There are software programmes which allow you to download as well as convert it online to the format you want .

http://vixy.net/

http://www.download.com/YouTube-Downloader/

You can download free FLV players to view your videos from here:-

http://applian.com/flvplayer/#keepvidPlay50

http://www.videolan.org/

Have fun! Enjoy!

Dont miss my favourite software for downloading and converting You Tube videos to iPod in the next post!


Copyright © 2008 Laila Rajaratnam. All Rights Reserved

Read more Entry>>

Saturday, November 15, 2008

Password Manager

Are you having trouble managing all your passwords, usernames and sites? Well, being a blogger and an Internet buff you must be registered in umpteen sites with various user names and passwords. Also, you must surely be aware that anyone can easily manoeuvre to your accounts and gain access to your browser's built-in password saver utility. So, naturally you must be having unusual and hard to guess passwords in each site and remembering them all must be real tough. Well, I came across a simple free programme to store all these info. It is called Password Prime 1.2 and it has been tested as spyware free as well! You can download it here !

Below is a figure of the Password Prime’s interface.

The command buttons are huge for easy use and there's a button for adding new username, password, and Web site information, a button for editing the entry, and a button for deleting the entry. A click on the website takes us to our entry's corresponding Web site. That is cool! Moreover username and password information can be easily cut and pasted into their respective fields. Therefore, Password Prime allows us to manage and organize log-in information. Give it a try!

Read more Entry>>

Thursday, November 13, 2008

How To Put Downloaded Limewire Movies to IPod?

You can download many free videos in the popular P2P programme Limewire. The videos can be downloaded in Limewire in all kinds of popular formats like ASF, ASX, AVI, MOV, MPEG, RAM, RM, WMV, VOB and so on. But then, iPod can playback only in MP4 and H264 video formats.
If you download the videos in MP4 or H264 format, you can simply drag and drop the videos from the Limewire library into your iTunes library and from there you can sync it to your iPod.
But, if you download the videos from Limewire in any other format other than MP4 or H264, they have to be converted to MP4 or H264 to be put into your ipod. To help you to convert videos into mp4 or h264 format ,you need to have a 3rd party tool to convert the videos, add them into iTunes library and then sync to iPod.
There are many good video converters. But the following two are easy to use and they can convert any format to mp4 or h264.
( This is a free software)
(This is a trial version)
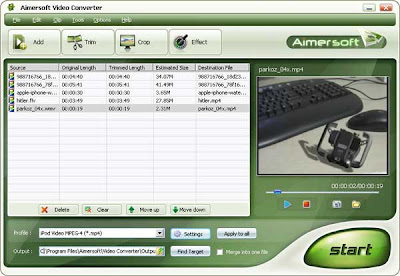
How to use Aimersoft iPod Video Converter to convert video to MP4 for iPod:-
1. Download and install Aimersoft iPod Video Converter
2. Run Aimersoft iPod Video Converter, click “Add” button to import your downloaded limewire videos, then click “Start” to start the conversion, the default setting works perfect.You can also click ‘File > Add DirectShow files’ to add the video files you want to convert.
3.Click the "Format"drop-down list to select the format you want.
4.Click "Start" to begin the conversion.
Warning: Don't use iTunes to convert limewire video as you may come across a situation in which the converted video doesn't contain any sound when you play the file in iTunes, or on your iPod. If this is the case, the original video file may be in a format that contains muxed (multiplexed) audio and video, and cannot be exported with audio.
Now for the final step!
After the conversion, use iTunes to transfer the mp4 video to your iPod. Just follow these steps:
  • Open iTunes and click ‘File’ .
  • Add your converted videos to iTunes library.
  • Plug in your iPod to computer, then iTunes will detect your iPod as a device.
  • Select your iPod device , click ‘Movies’ tab.
  • Check the videos you want to sync and click ‘Apply’
You’re done! Good! Now you have the downloaded movies in your iPod! Enjoy!
Read more Entry>>

Wednesday, November 12, 2008

How To Recover Deleted Bookmarks From Mozilla Firefox?

This morning when I started my Firefox 2.0.0.17 browser, my heart nearly stopped! Why? I saw that all my bookmarks had disappeared. I have no idea how this happened! I desperately needed them back! I have got to have them back somehow! I did a few searches which coughed up a few techniques but the following two methods were easy and it WORKED! I now have my book marks back!

Method 1

Go to START menu, and go to RUN. Type in "%APPDATA%\Mozilla\Firefox\Profiles" (without quotations) and hit RUN.

Open the file which says "xxxxx.default" or something. Then go to the folder that says "bookmark backups".

You will see a bunch of Firefox Documents (this is the type of file they are). Open the most recent one - they will be named by date, and check whether the webpage that pops up has all the Bookmarks that you used to have. If you have all your old bookmarks listed in the page that you just opened, then :

  • Close mozilla,
  • Go back to the "bookmark backups" folder
  • COPY the file that you just opened.
  • Go back to the xxxx.default folder that contains the bookmark backups folder. Find another file with the same format (Firefox Document) named "bookmarks" or "bookmarks.html".
  • DELETE this file.

  • Now paste the DATED file into this folder and rename it as "bookmarks" or "bookmarks.html" depending on the name of the file you deleted.


Don't worry, Mozilla will automatically create another file called "bookmark".

Method 2

Go to the Firefox Profiles folder - in XP you'll find it under :-

C:\Documents and Settings\Administrator.CLONEPC\Application Data\Mozilla and find the bookmark backups folder. It usually holds five days' worth of backups. Change yesterday's file to bookmarks. html and replace the one in the Profiles folder. That’s it ! Done!

Firefox automatically stores 5 days worth of backups of the bookmarks, but if the bookmarks were deleted too long ago then they are probably gone for good. See Lost Bookmarks for more details or follow this link :

http://support.mozilla.com/en-US/kb/Lost+bookmarks

Anyway, am I happy to have my bookmarks back!


Copyright © 2008 Laila Rajaratnam. All Rights Reserved

Read more Entry>>

Saturday, November 8, 2008

Transfer Music From Limewire To IPod

Surely by now a huge collection of innumerable downloaded songs are happily sitting in your computer! You would most certainly want to put them onto your iPod so that you can lug them along wherever you go! Did you download the free music from Limewire? No? Well, you can download Limewire from here.
To transfer music downloaded from Limewire to iPod, you need to have the files in the format supported by ipod. However, you cannot transfer the songs directly from Limewire to iPod. You have to transfer them via iTunes, a software programme available with the purchase of your iPod or it can be downloaded here at http://www.apple.com.
What are the audio formats supported by iPod?
Audio files compatable with iPod are :
MP3
AAC
AIFF**
WAV**
M4A
M4P
** Can be converted using third-party software to MP3, AAC, etc.
Now that you are aware of the formats that are compatible with your iPod you can download the music in these formats. However, Mp3 music can be replayed in other music systems via your iPod.
Let’s examine the process:
· Search and download songs from Limewire.
· Select the formats supported by iPod so that they can be directly transferred to iPod using iTunes.
Yes, done! The files have been downloaded from Limewire. Songs that are downloaded from Limewire will not show up on the Itunes library.And unless they are in your iTunes library you will not be able to transfer the songs to your iPod.
So now, how do I put the music into my iTunes Library?
There are a few simple procedures to go about transferring the files to itunes library.
After you download the songs :-
Method 1
· Open iTunes.
· Click ‘File’, from the upper left corner.
· Select ‘Add file to library’, browse your computer hard drive and find the songs downloaded by Limewire.
· Click OK and the songs will be put in your iTunes.
(When you download songs from Limewire it goes into your limewire folder in your computer. Thats most probably - C:\Program Files\Limewire\downloads)
Method 2
· Open Limewire.
· Go to Limewire>Preferences>iTunes>Importing. Check the box next to ‘Enable iTunes importing’. Now Limewire will automatically add songs to iTunes in a playlist named "Limewire".
Method 3
· Open Limewire. Open iTunes.
· Go to your library in Limewire. Click the EXPLORE button.
· Drag and drop the files into iTunes library.
Method 4
· Download the music from Limewire (save to a directory).
· Double click the song downloaded and it should play using iTunes. The music gets automatically stored in the iTune's library.
  • You can create folders within iTunes and drag/drop from the library into the new folder.
Now your itunes library contains all your songs that you want to transfer over to your iPod.
The last step is a breeze. Plug in your iPod to the USB port in your computer, and you’ll notice the new option to add songs from your iTunes library to the iPod.
Click and drag your files into the iPod transfer screen and then you’re done!
All your favourite songs are now in your iPod!
Enjoy your music wherever and whenever you want!


Copyright © 2008 Laila Rajaratnam. All Rights Reserved
Read more Entry>>

Transfer Music from Windows Media Player to IPod

Do you have a large collection of songs in your Windows Media Player library? Then, they would be primarily stored in your My Music folder or just Music folder in Windows Vista! Would you like to transfer them to your iPod? But then, you will be able to transfer songs onto your Ipod only through iTunes , a programme which comes along with your Ipod purchase or it can be downloaded at http://www.apple.com. You can automatically import all the songs into iTunes in a few uncomplicated steps. Do you have music stored in other folders besides the My Music folder? No problem! You can repeat the same steps for each folder that has tracks you want to import.
The music files stored in Windows Media Player will be in MP3 or WMA format . WMA format is not supported by iPod , so hence you have to convert it to either MP3 or AAC.Mp3 is a better option as you will be able to play the files on your car stereo or some other player as well.
Steps to import your music to iTunes:
Open iTunes.
If you want to import a folder to iTunes -
Click File > Add Folder to Library and choose your My Music folder.
You’re music has been transferred!
Violá! Done!
If you want to import just a file to iTunes -
Click File > Add File to Library and choose the file or files from where it is stored.
Yes, that it!
ITunes usually handles the file conversion process too. By default, iTunes is set to convert WMA files to AAC format during the import process.
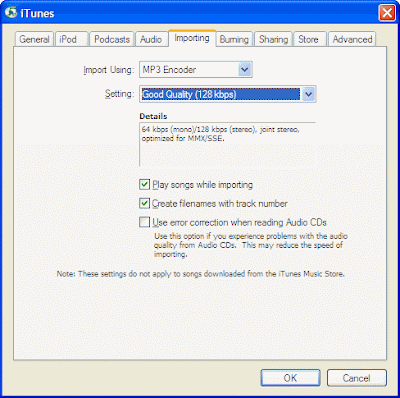
Though AAC files are fully compatible with all iPods , by switching a preference setting in iTunes, you can convert the files to MP3.
Open the iTunes >Preferences > Importing tab.
Choose MP3 encoder from the dropdown menu and select a quality setting comparable to the quality of the WMA files.
Clock OK. Your files will start converting.


If you have a large music library in WMA format, converting WMA to AAC may take a wee bit of time. So, take a break! Have a burger or pizza. You can even whip up a quick meal and get back to your computer in a while. Your files would have been converted!
Now you can put the music into your ipod. Hows that?Plug in your Ipod to the USB port in your computer, and you’ll notice the new option to add songs from your Itunes library to the Ipod.Click and drag your files into the Ipod transfer screen and then you’re done!


Enjoy the music!


Copyright © 2008 Laila Rajaratnam. All Rights Reserved

Read more Entry>>

Friday, November 7, 2008

Peer-to-Peer File Sharing

Love feet tapping music? Slow sentimental romantic songs? Jazz ? Hip- hop? Gospels or Devotional? Whatever genre, they are all up there for grabs in the internet. Really ? Yes, go for it, moreover they are free as well! You can download as many songs as you want. How is getting free music possible? By the file sharing or the peer to peer ( p2p) network method. All that your computer needs to join a peer-to-peer network is an Internet connection and P2P software.

What is P2P? Peer-to-Peer is a file (music or video) sharing method that allows files to be swapped directly between users' computers. In the P2P networking the files(music or video) are not stored in a central server but in a P2P software which acts as a server and stores the files. Thus, in peer to peer file sharing, people are actually connecting directly to your computer to retrieve files and likewise it allows you to search for files on other people's computers. Usually, people will only be able to access the single folder that you have selected to share. In simple words, p2p means that by installing certain software programmes, people are able to directly share files (music or video) with one another.

The peer-to-peer (P2P) network is popular with music lovers as they can sample and collect music from a wide range of artists. Since millions of individuals around the world act as music providers, music of different genres is available through file-sharing than at the local music store. Remixes, obscure tracks, and copies of live performances which are unavailable on the commercial CDs are often found on the P2P networks .Though there are other types of files like movies, television shows, and video games which can also be downloaded and shared in this manner, music file-sharing by far is the most popular and in demand activity.

To access a P2P network, users simply download and install a suitable P2P client application. There are many P2P networks and P2P software applications that do exist.

Some popular P2P networks are:

  • BitTorrent
  • Gnutella
  • Ares

Some popular P2P applications are:

Beware ! Some files over the P2P network contains:

  • Embedded advertising
  • Fake and/or corrupted files
  • Ads or spyware

The negative side of P2P networking is that this type of activity has led to a lot of software piracy and illegal music downloads. Therefore, it is good to download the software and music only from legitimate websites.

Yes, just like millions of people who use free P2P file sharing software to swap music, video and other files over the Internet, even you can do it!


Copyright © 2008-2010 Laila Rajaratnam. All Rights Reserved


Read more Entry>>

How to Convert CD Tracks to WAV, MP3 and WMA using Windows Media Player

Would you like to convert your audio CD tracks to WAV, MP3 or WMA using Windows Media Player 11 which comes along with your windows XP or Vista. Would you like to have the music either stored in your computer or transferred to your iPod. Its actually very simple!
This requires a little bit of configuration. After that, it automatically downloads song titles, album cover art and more. Best of all, it is easy and it takes very little time to master the CD "ripping" process.
Here's what you need to get started:
· Access to the Internet
· Windows XP or Windows Vista
· A little space on your hard drive (at least 250 megabytes)
Just follow these easy steps:
Open Windows Media Player by clicking the Windows Start Menu > Accessories > Entertainment >Windows Media player.
The Windows Media Player will appear shortly.
If you do not see the menu bar in the windows media player, then check out the interface to access the menu bar.
Choose Tools>Options to bring up the Option Dialog box.
Then:
· Choose the Rip Music tab and here you will find all the relevant options.
· Click the Change button to allow you to select an output folder.
· Click the Format dropdown list to choose from either WAV, MP3 or Windows Media Audio (WMA) formats.
· You can drag the Audio quality slider to balance between smaller file size and higher sound quality, as necessary.
· Click on OK to apply the changes.
These become your default settings and Windows Media Player will remember them the next time you want to rip (convert) CD audio tracks.
Now to convert CD tracks:
Run windows Media Player
Place an audio CD in your CD drive.
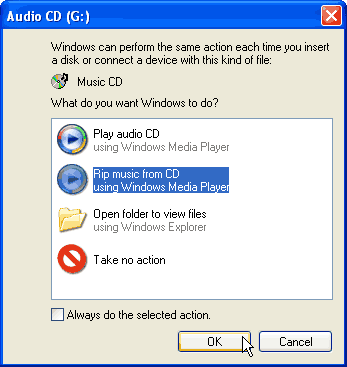
The following dialog box will appear-

Choose the Rip music from CD option to automatically convert all your tracks to the selected output format in the selected folder.
That’s it! Done! You have converted your tracks to the format you had selected!


Another simple
option:
  • Launch Windows Media Player.
  • Make sure that the CD tracks are visible.
  • Click the prominent Rip Music icon/button.

It will take a little while! Anyway, finally you have your tracks ripped and converted!
Enjoy your music!


Copyright © 2008 Laila Rajaratnam. All Rights Reserved


Read more Entry>>